> ## Documentation Index
> Fetch the complete documentation index at: https://docs.clarion.cantina.xyz/llms.txt
> Use this file to discover all available pages before exploring further.
# AWS via EventBridge and SNS
> Connect your AWS account to Clarion for CloudTrail events, CloudWatch alarms, GuardDuty findings, and IAM agent tools.
This guide walks you through connecting your AWS account to Clarion. By the end, Clarion will receive CloudTrail events, CloudWatch alarms, and GuardDuty findings — and have IAM permissions to run agent tools (CloudTrail lookup, Route 53, CloudWatch queries).
***
## Prerequisites
* An AWS account with admin or IAM-capable permissions.
* Access to the Clarion dashboard.
***
## Step 0 — Generate a Webhook URL in Clarion
Before configuring AWS subscriptions, open your Clarion workspace and generate a webhook URL.
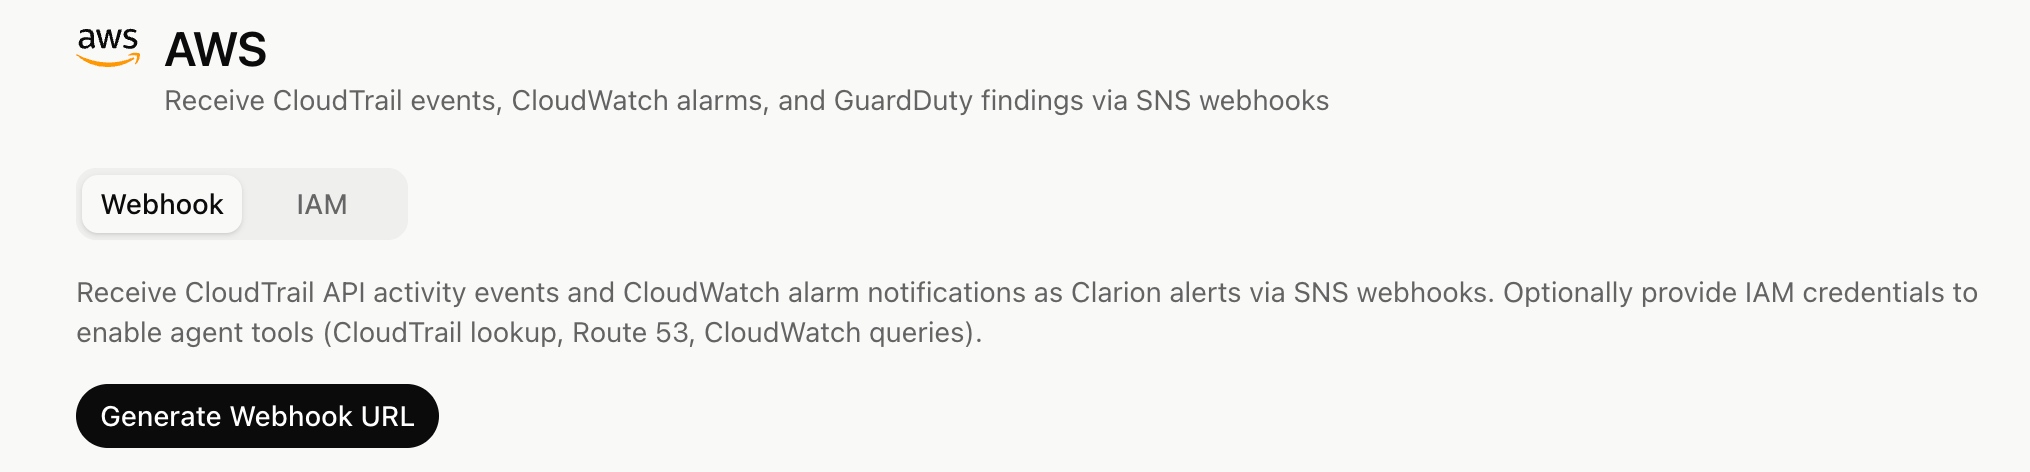 You will use this URL as the HTTPS subscription endpoint for your SNS topics in the steps below.
Keep this URL handy — you'll need it for CloudTrail, CloudWatch, and GuardDuty setup. Clarion also requires the exact SNS topic ARN for each topic that publishes to the webhook.
SNS messages are accepted only from topic ARNs saved in Clarion. Existing AWS monitors with no saved SNS topic ARN must be updated before Clarion can confirm subscriptions or receive notifications.
***
## Step 1 — CloudTrail via EventBridge
Send CloudTrail management events (API calls and console sign-ins) to Clarion through an SNS topic and an EventBridge rule.
This path sends the CloudTrail event body through EventBridge and SNS. Clarion does not need S3 bucket access for this delivery mode.
### 1.1 Create an SNS topic
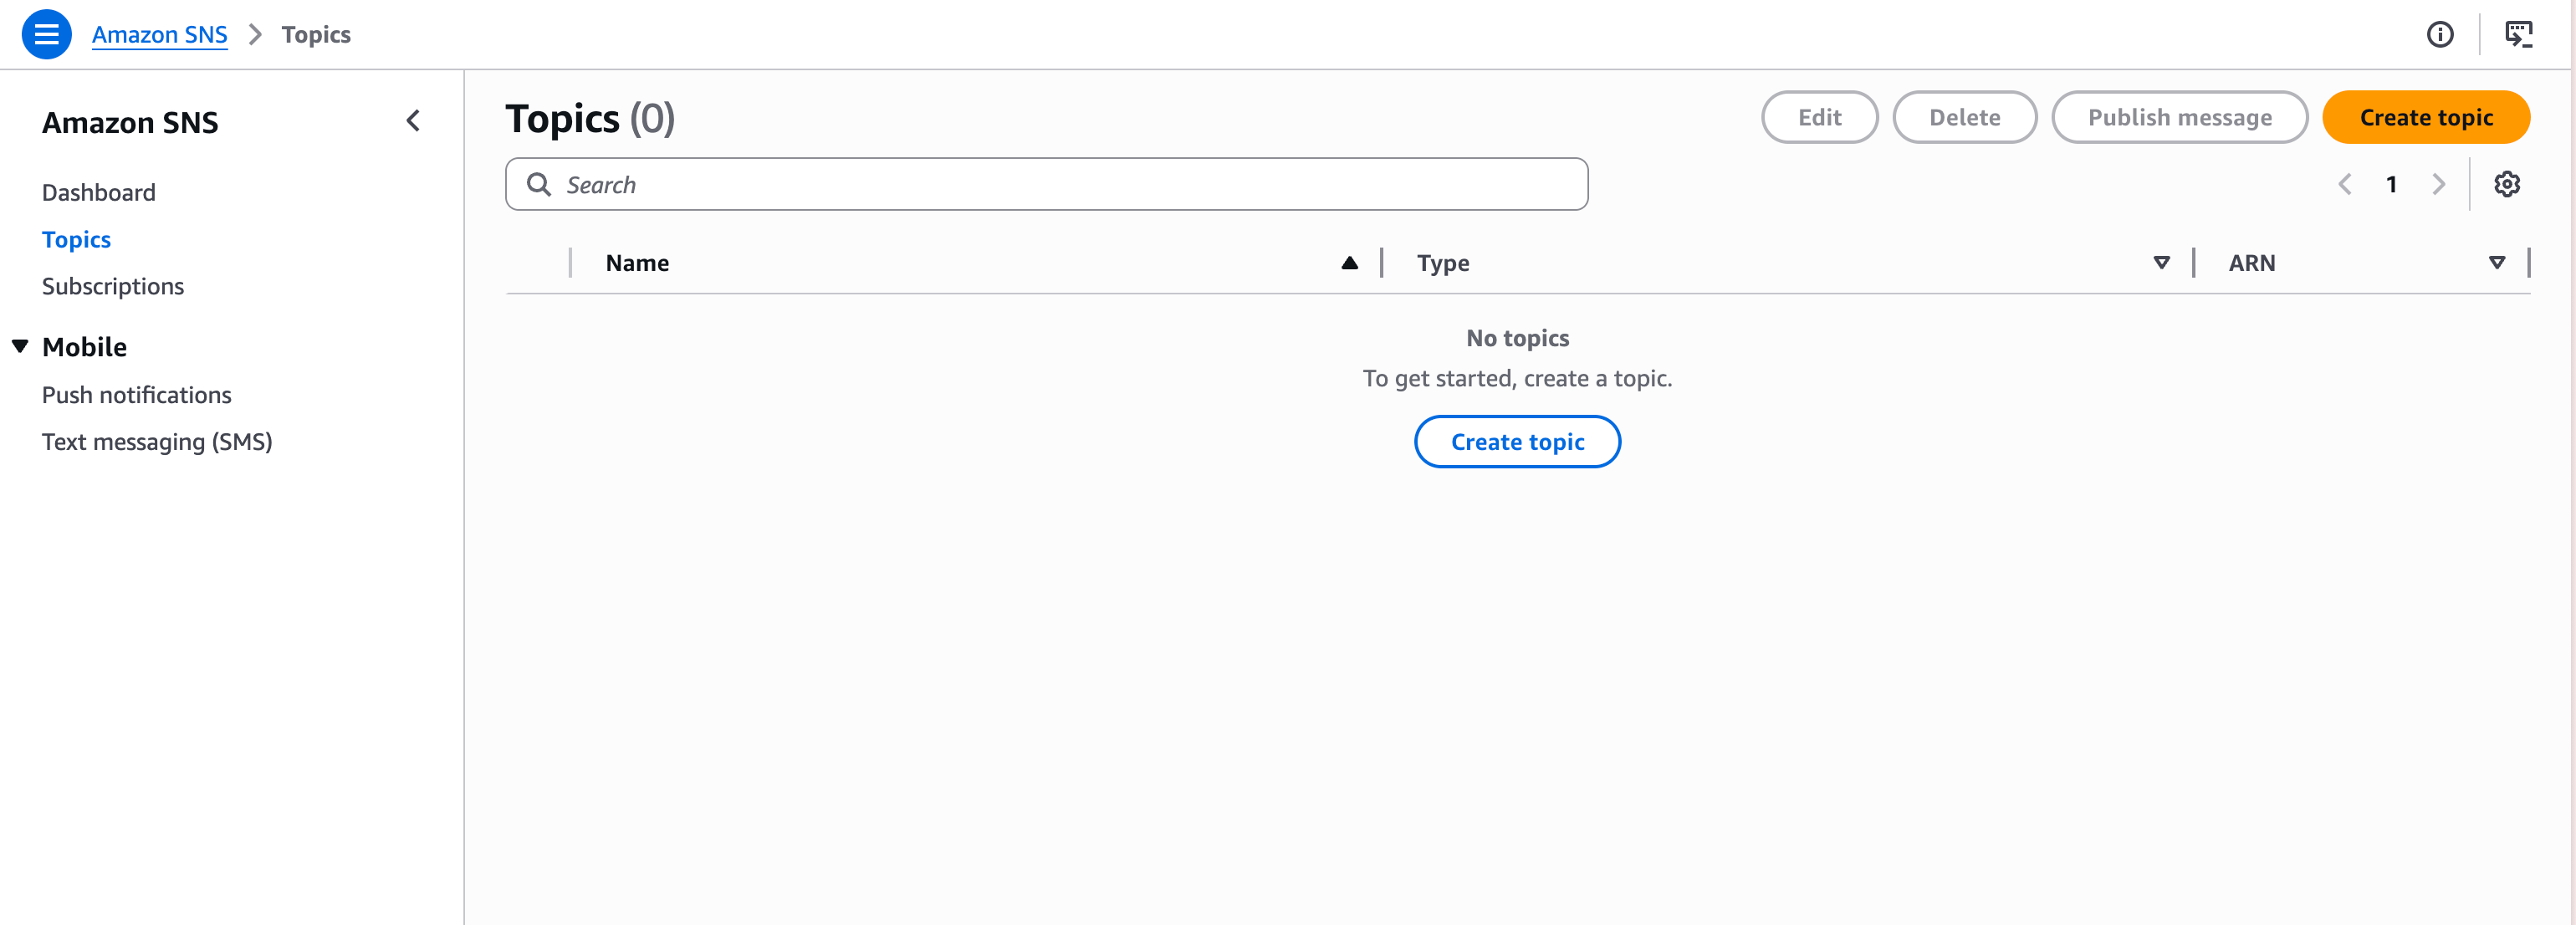
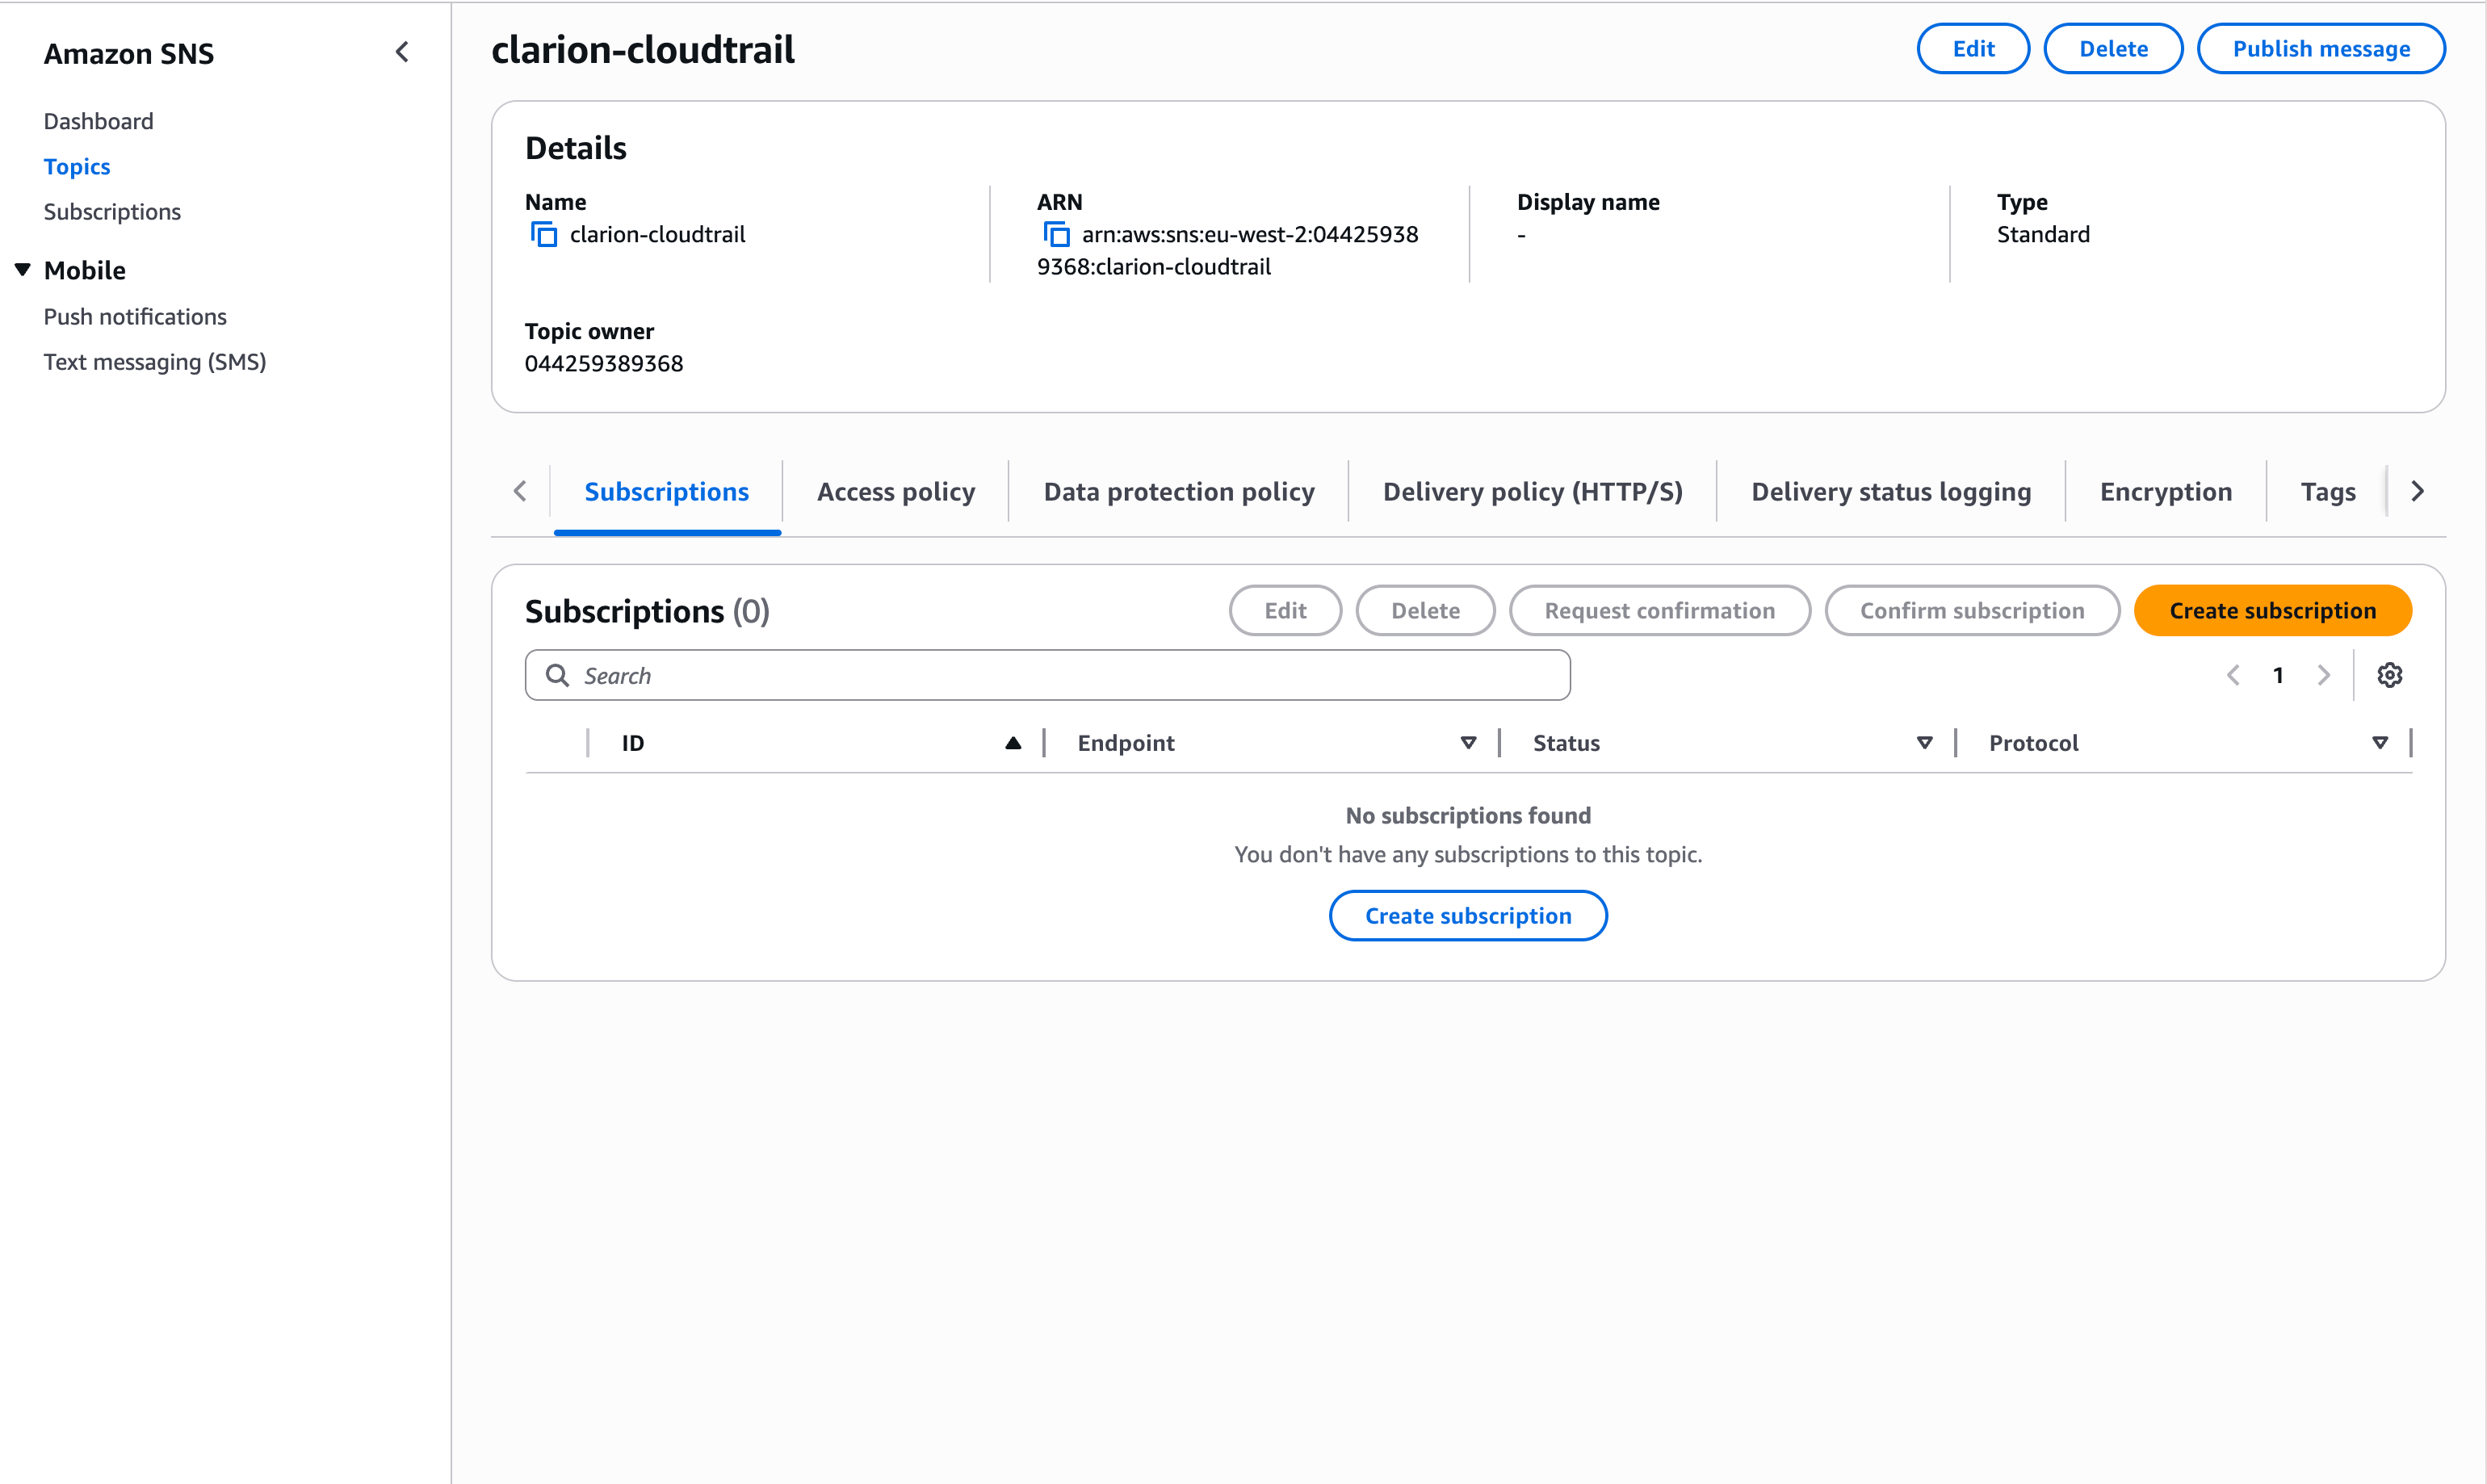
1. Open the Amazon SNS console and go to **Topics**.
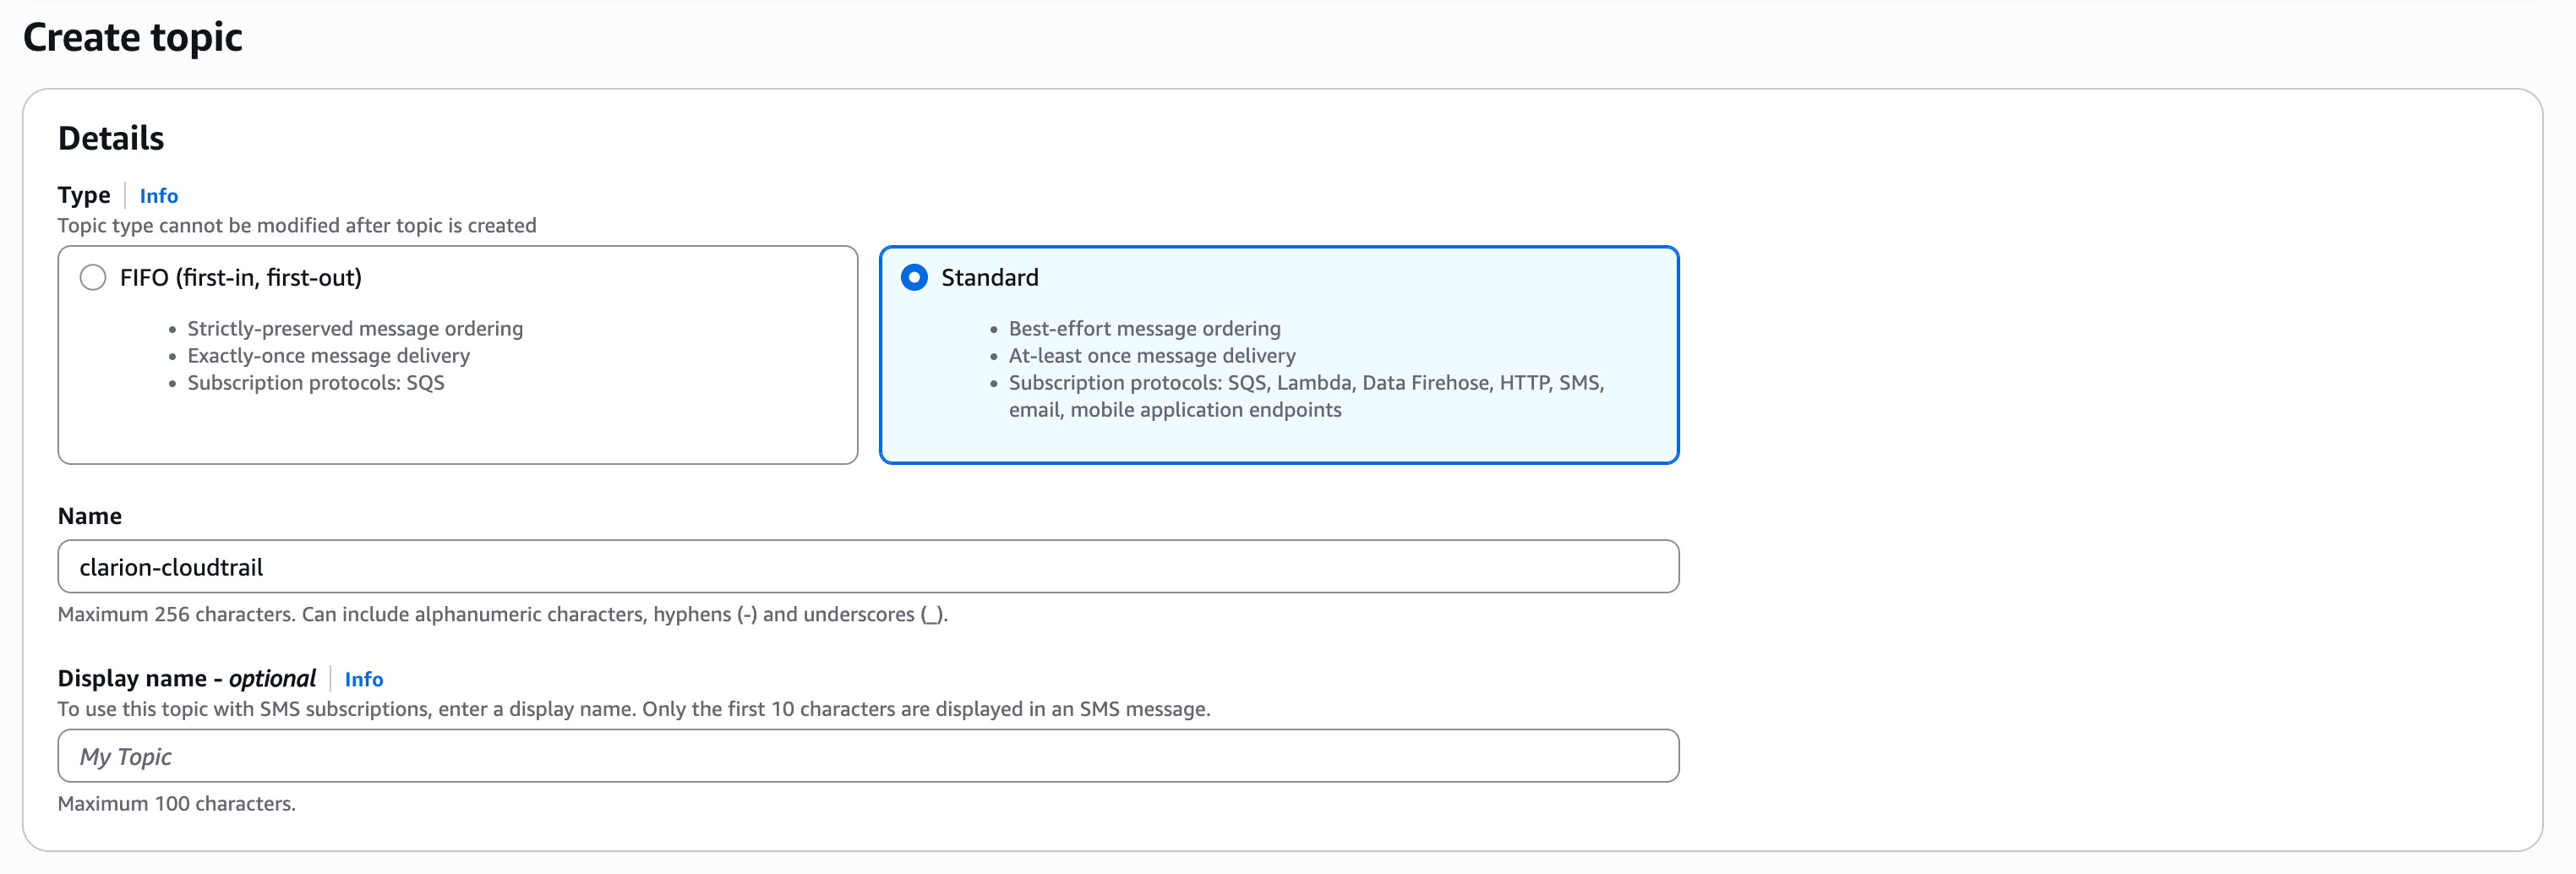
2. Create a new **Standard** topic (e.g. `clarion-cloudtrail`).
3. Copy the topic ARN, paste it into Clarion's SNS topic ARN field for the CloudTrail monitor, and save the monitor.
Currently encryption of the topic is not supported, but Amazon SNS provides in-transit encryption by default.
You will use this URL as the HTTPS subscription endpoint for your SNS topics in the steps below.
Keep this URL handy — you'll need it for CloudTrail, CloudWatch, and GuardDuty setup. Clarion also requires the exact SNS topic ARN for each topic that publishes to the webhook.
SNS messages are accepted only from topic ARNs saved in Clarion. Existing AWS monitors with no saved SNS topic ARN must be updated before Clarion can confirm subscriptions or receive notifications.
***
## Step 1 — CloudTrail via EventBridge
Send CloudTrail management events (API calls and console sign-ins) to Clarion through an SNS topic and an EventBridge rule.
This path sends the CloudTrail event body through EventBridge and SNS. Clarion does not need S3 bucket access for this delivery mode.
### 1.1 Create an SNS topic
1. Open the Amazon SNS console and go to **Topics**.
2. Create a new **Standard** topic (e.g. `clarion-cloudtrail`).
3. Copy the topic ARN, paste it into Clarion's SNS topic ARN field for the CloudTrail monitor, and save the monitor.
Currently encryption of the topic is not supported, but Amazon SNS provides in-transit encryption by default.
 ### 1.2 Subscribe Clarion to the topic
1. On the topic you just registered in Clarion, click **Create subscription**.
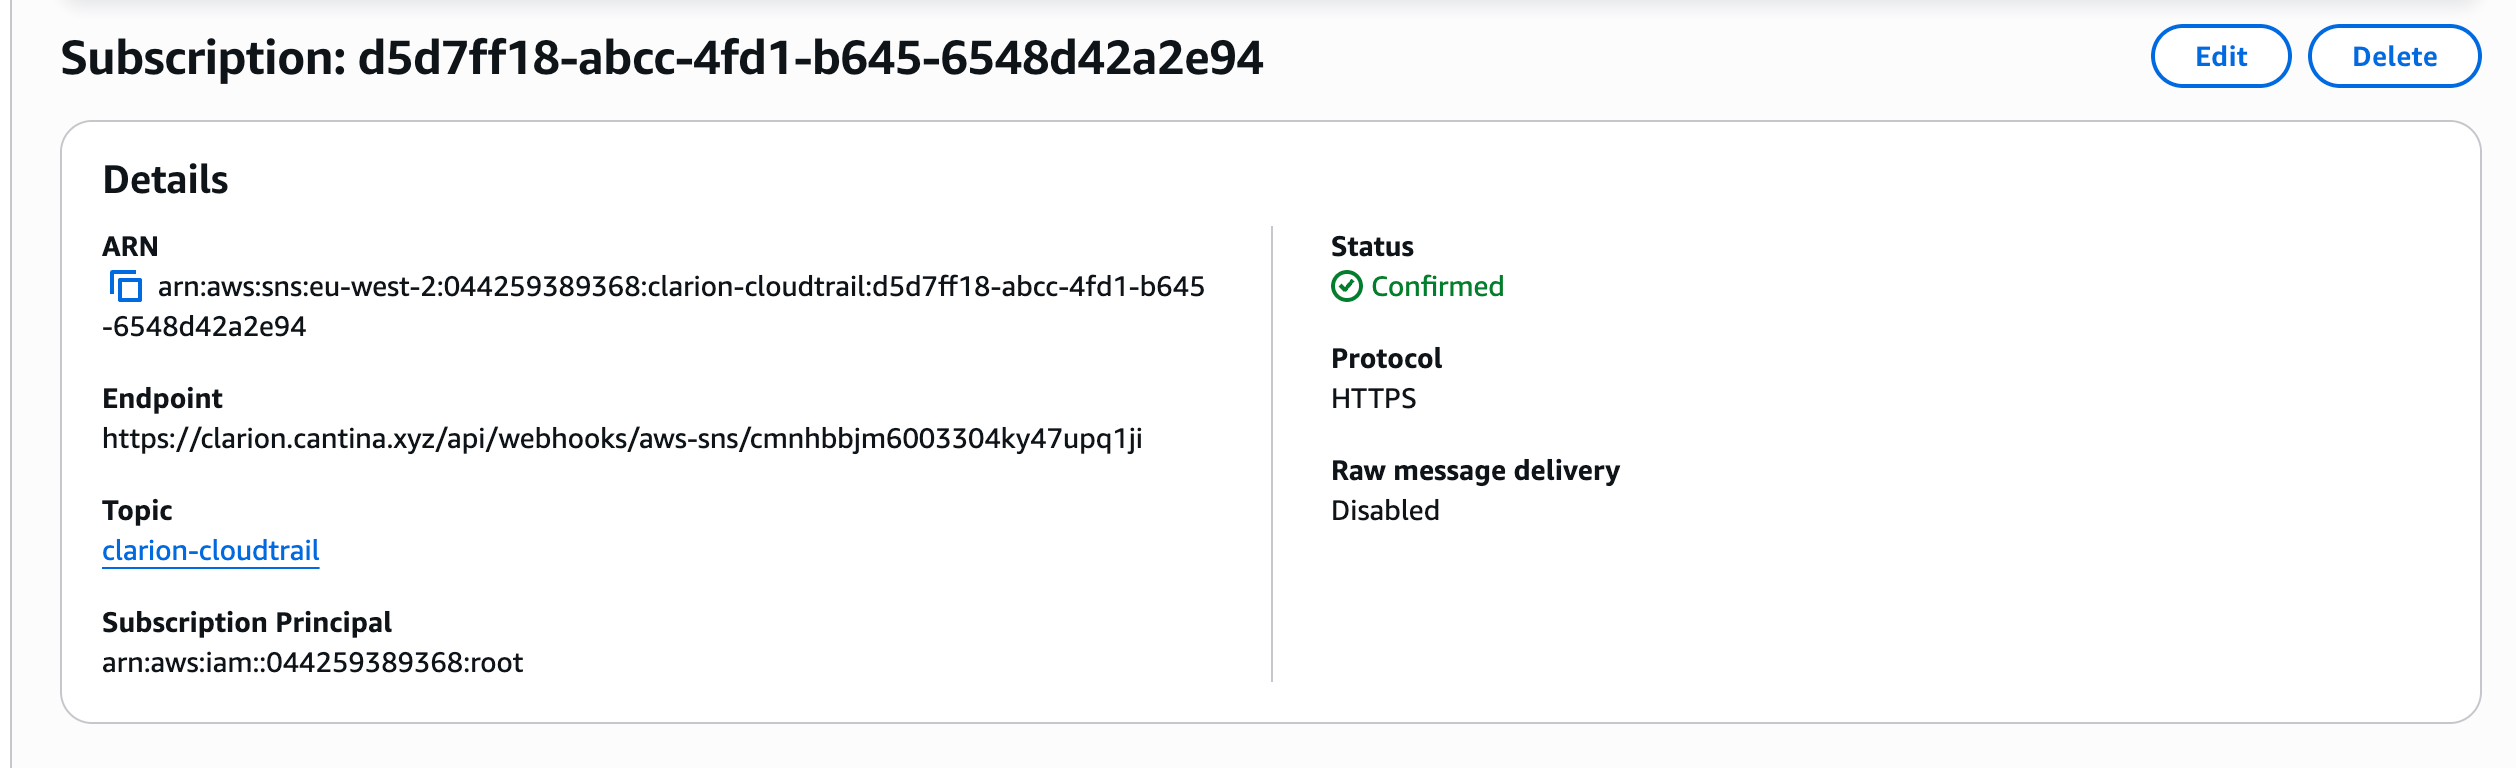
2. Set the protocol to **HTTPS** and paste the webhook URL from Clarion.
3. SNS will send a confirmation request — Clarion auto-confirms it.
### 1.2 Subscribe Clarion to the topic
1. On the topic you just registered in Clarion, click **Create subscription**.
2. Set the protocol to **HTTPS** and paste the webhook URL from Clarion.
3. SNS will send a confirmation request — Clarion auto-confirms it.
 ### 1.3 Create an EventBridge rule
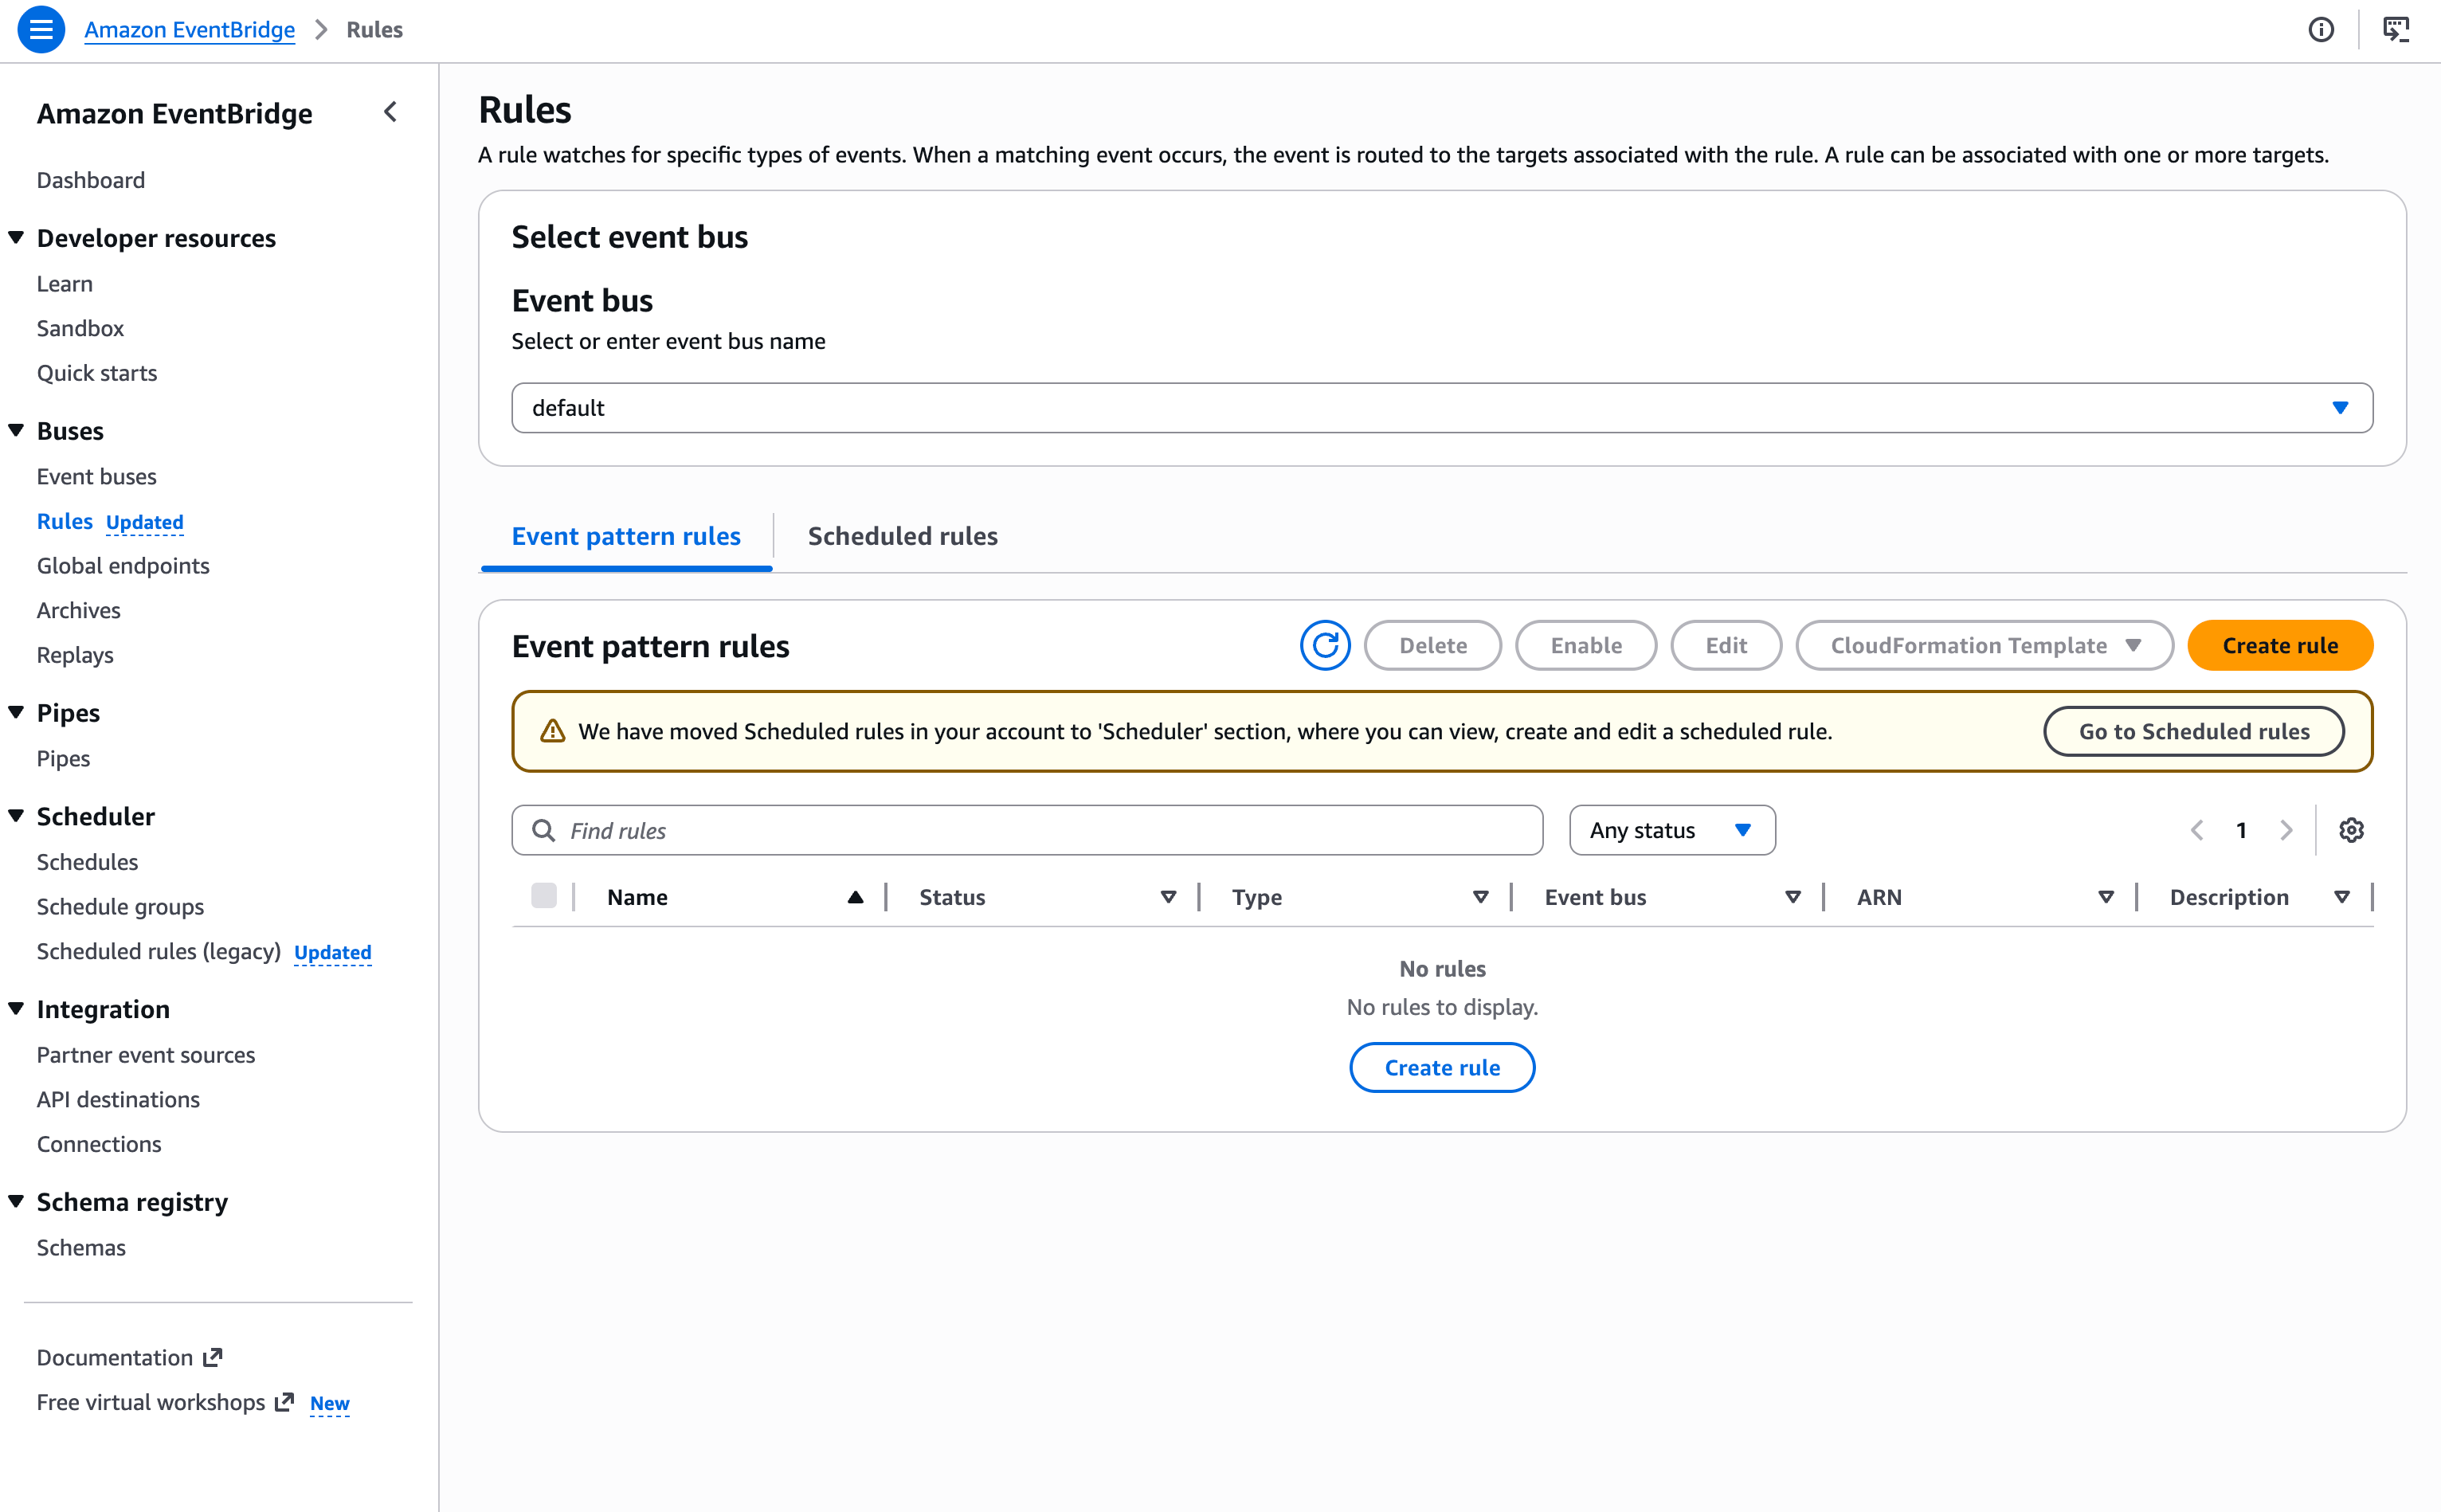
1. Open the Amazon EventBridge console and create a new rule.
### 1.3 Create an EventBridge rule
1. Open the Amazon EventBridge console and create a new rule.
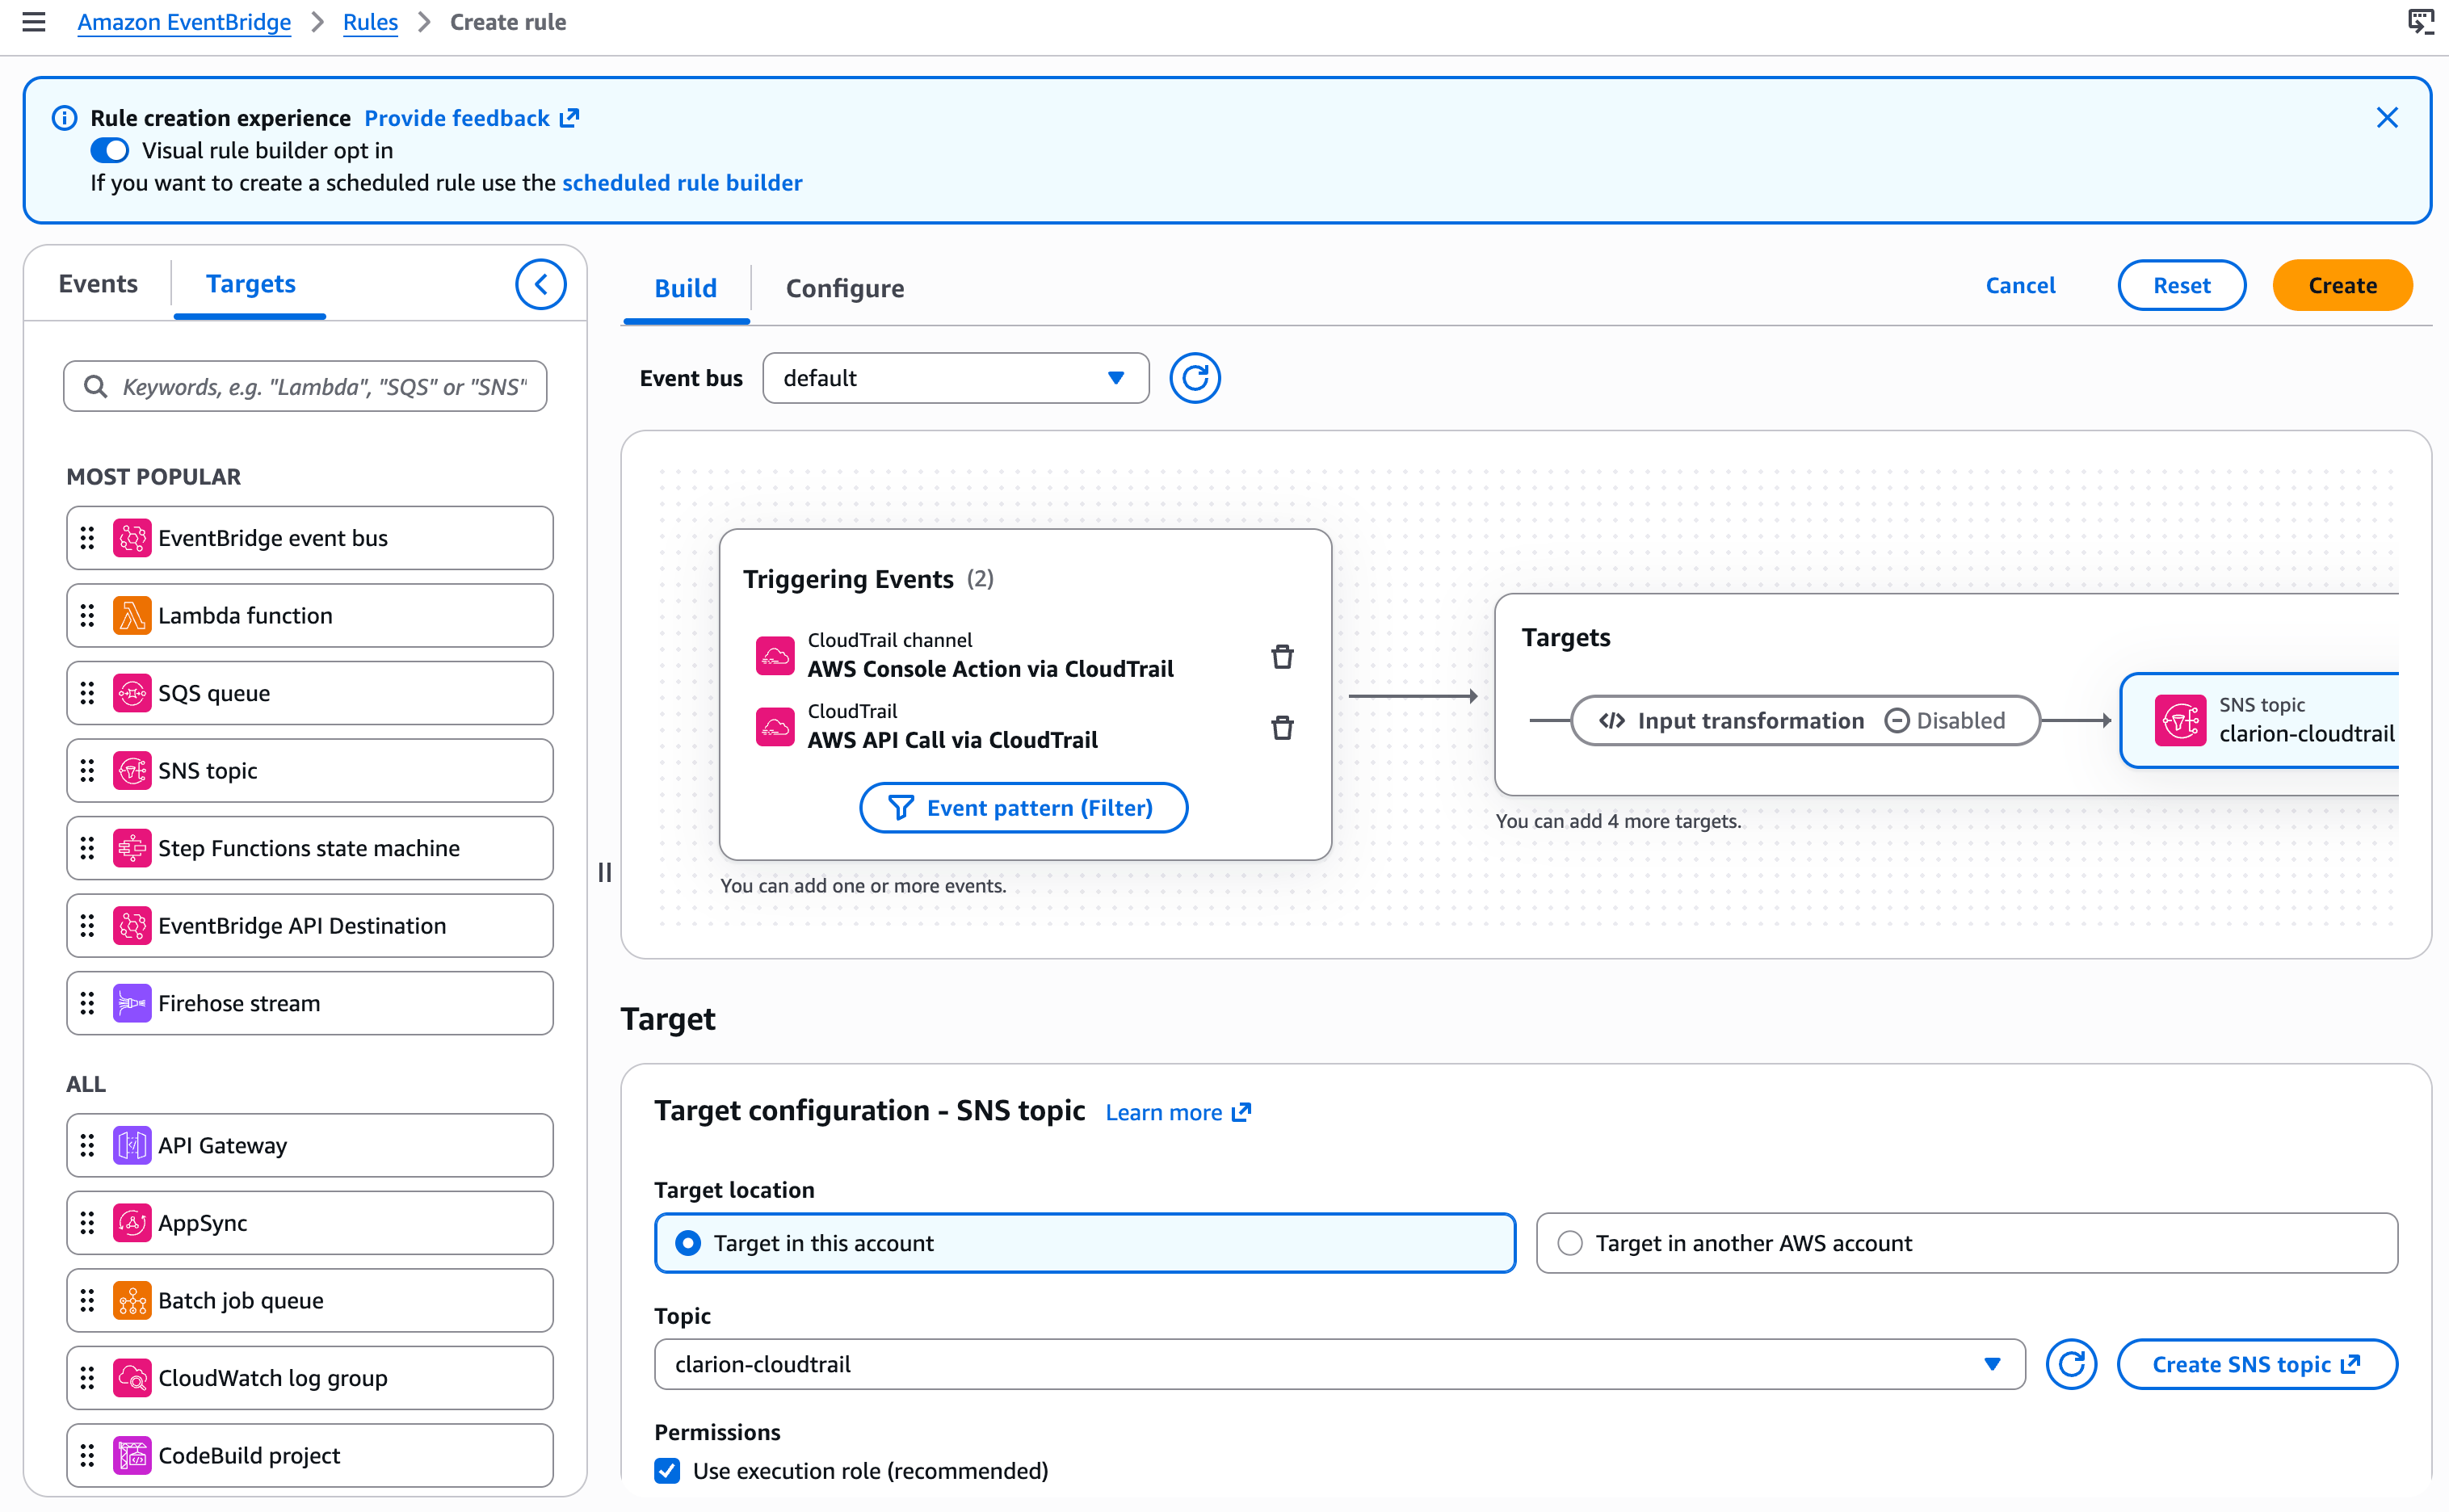
 2. Use the following event pattern to forward all CloudTrail events to Clarion:
 ```json theme={null}
{
"detail-type": [
"AWS API Call via CloudTrail",
"AWS Console Sign In via CloudTrail",
"AWS Console Signin via CloudTrail",
"AWS Service Event via CloudTrail"
]
}
```
EventBridge detail-type matching is **case-sensitive**. The pattern above
includes both known casing variants of the console sign-in detail-type
(`Sign In` and `Signin`) to ensure events are captured regardless of
the variant your account emits. Do **not** add a `source` filter — the
`source` field varies by originating AWS service (e.g. `aws.iam`,
`aws.ec2`, `aws.signin`) and filtering on it would silently drop events.
These detail-types cover the following CloudTrail event categories:
| Detail type | What it captures | Examples |
| ------------------------------------ | ---------------------------------------- | ---------------------------------------------------------------------- |
| `AWS API Call via CloudTrail` | All management and data API calls | `DeleteUser`, `PutBucketPolicy`, `RunInstances` |
| `AWS Console Sign In via CloudTrail` | Console login and logout events | `ConsoleLogin` (success, failure, MFA) |
| `AWS Service Event via CloudTrail` | Non-API events triggered by AWS services | Log file delivery, automated key rotation, service-linked role actions |
Clarion has signal rules that depend on console sign-in events (login failures,
MFA checks, root account logins, multi-IP detection), so including the
console sign-in detail-types is important for full coverage.
A fourth detail-type, `AWS Insight via CloudTrail`, exists for
[CloudTrail Insights](https://docs.aws.amazon.com/awscloudtrail/latest/userguide/logging-insights-events-with-cloudtrail.html)
anomaly detection events. Add it to the pattern if you have Insights enabled
on your trail.
3. Set the target of the rule to the SNS topic you created (`clarion-cloudtrail`).
***
## Step 1B — CloudTrail via Consolidated S3 Logging
An [AWS Organizations trail](https://docs.aws.amazon.com/awscloudtrail/latest/userguide/creating-trail-organization.html) writes CloudTrail events from every member account and region into a single S3 bucket — typically a dedicated log-archive account. Clarion subscribes to that bucket's S3 event notifications, fetches each new log file, and creates one signal per CloudTrail record. One SNS topic and one Clarion subscription cover the whole organization.
For this consolidated S3 path, Clarion must be able to read each CloudTrail log object from S3. See [CloudTrail via existing S3 bucket](/integrations/aws/cloudtrail-s3) for the required IAM setup.
### 1B.1 Place the Clarion IAM role in the log-archive account
Configure the Clarion IAM role from Step 4 **in the account that owns the consolidated CloudTrail bucket** — usually the AWS Organizations log-archive account. The role needs S3 read access to the CloudTrail log objects.
### 1B.2 Create an SNS topic for S3 notifications
1. In the log-archive account, open the SNS console and create a **Standard** topic in the same region as the consolidated log bucket (e.g. `clarion-cloudtrail-s3`).
2. Copy the topic ARN, add it to Clarion's **SNS topic ARN** list on the CloudTrail monitor, and save.
S3 event notifications deliver only to SNS topics in the same region as the bucket.
### 1B.3 Subscribe Clarion to the topic
1. On the topic, click **Create subscription**.
2. Set the protocol to **HTTPS** and paste the webhook URL from Step 0.
3. Clarion auto-confirms the subscription.
### 1B.4 Configure S3 event notifications on the bucket
1. In the log-archive account, open the consolidated CloudTrail bucket in the S3 console.
2. Go to **Properties → Event notifications → Create event notification**.
3. Restrict the trigger to the CloudTrail prefix (e.g. `AWSLogs/`) and suffix `.json.gz`.
4. Event types: **All object create events** (`s3:ObjectCreated:*`).
5. Destination: **SNS topic**, then select the topic from 1B.2.
### 1B.5 (SSE-KMS only) Allow the Clarion role to use the bucket's KMS key
If the consolidated log bucket uses SSE-KMS, the CMK's key policy must allow the Clarion IAM role from Step 4 to call `kms:Decrypt`. Keys created through the CloudTrail setup wizard delegate to IAM by default, in which case Clarion's role policy is sufficient and no key-policy change is needed. Otherwise, add the following statement to the CMK's key policy, replacing ``:
```json theme={null}
{
"Sid": "AllowClarionDecrypt",
"Effect": "Allow",
"Principal": { "AWS": "" },
"Action": "kms:Decrypt",
"Resource": "*"
}
```
***
## Step 2 — CloudWatch Alarms
Send CloudWatch alarm state changes to Clarion by publishing to an SNS topic subscribed to your webhook URL.
1. Create a new SNS **Standard** topic for CloudWatch alarms (e.g. `clarion-cloudwatch`), or reuse a topic you have already registered in Clarion.
2. Copy the topic ARN, paste it into Clarion's SNS topic ARN field for the CloudWatch monitor, and save the monitor.
3. Add an **HTTPS** subscription using the webhook URL from Clarion. Wait for Clarion to auto-confirm.
4. In the CloudWatch console, open the alarm(s) you want Clarion to monitor.
5. Edit the alarm's notification actions and set it to publish to the SNS topic you created.
You can point multiple alarms at the same SNS topic — no need to create one per alarm.
***
## Step 3 — GuardDuty Findings
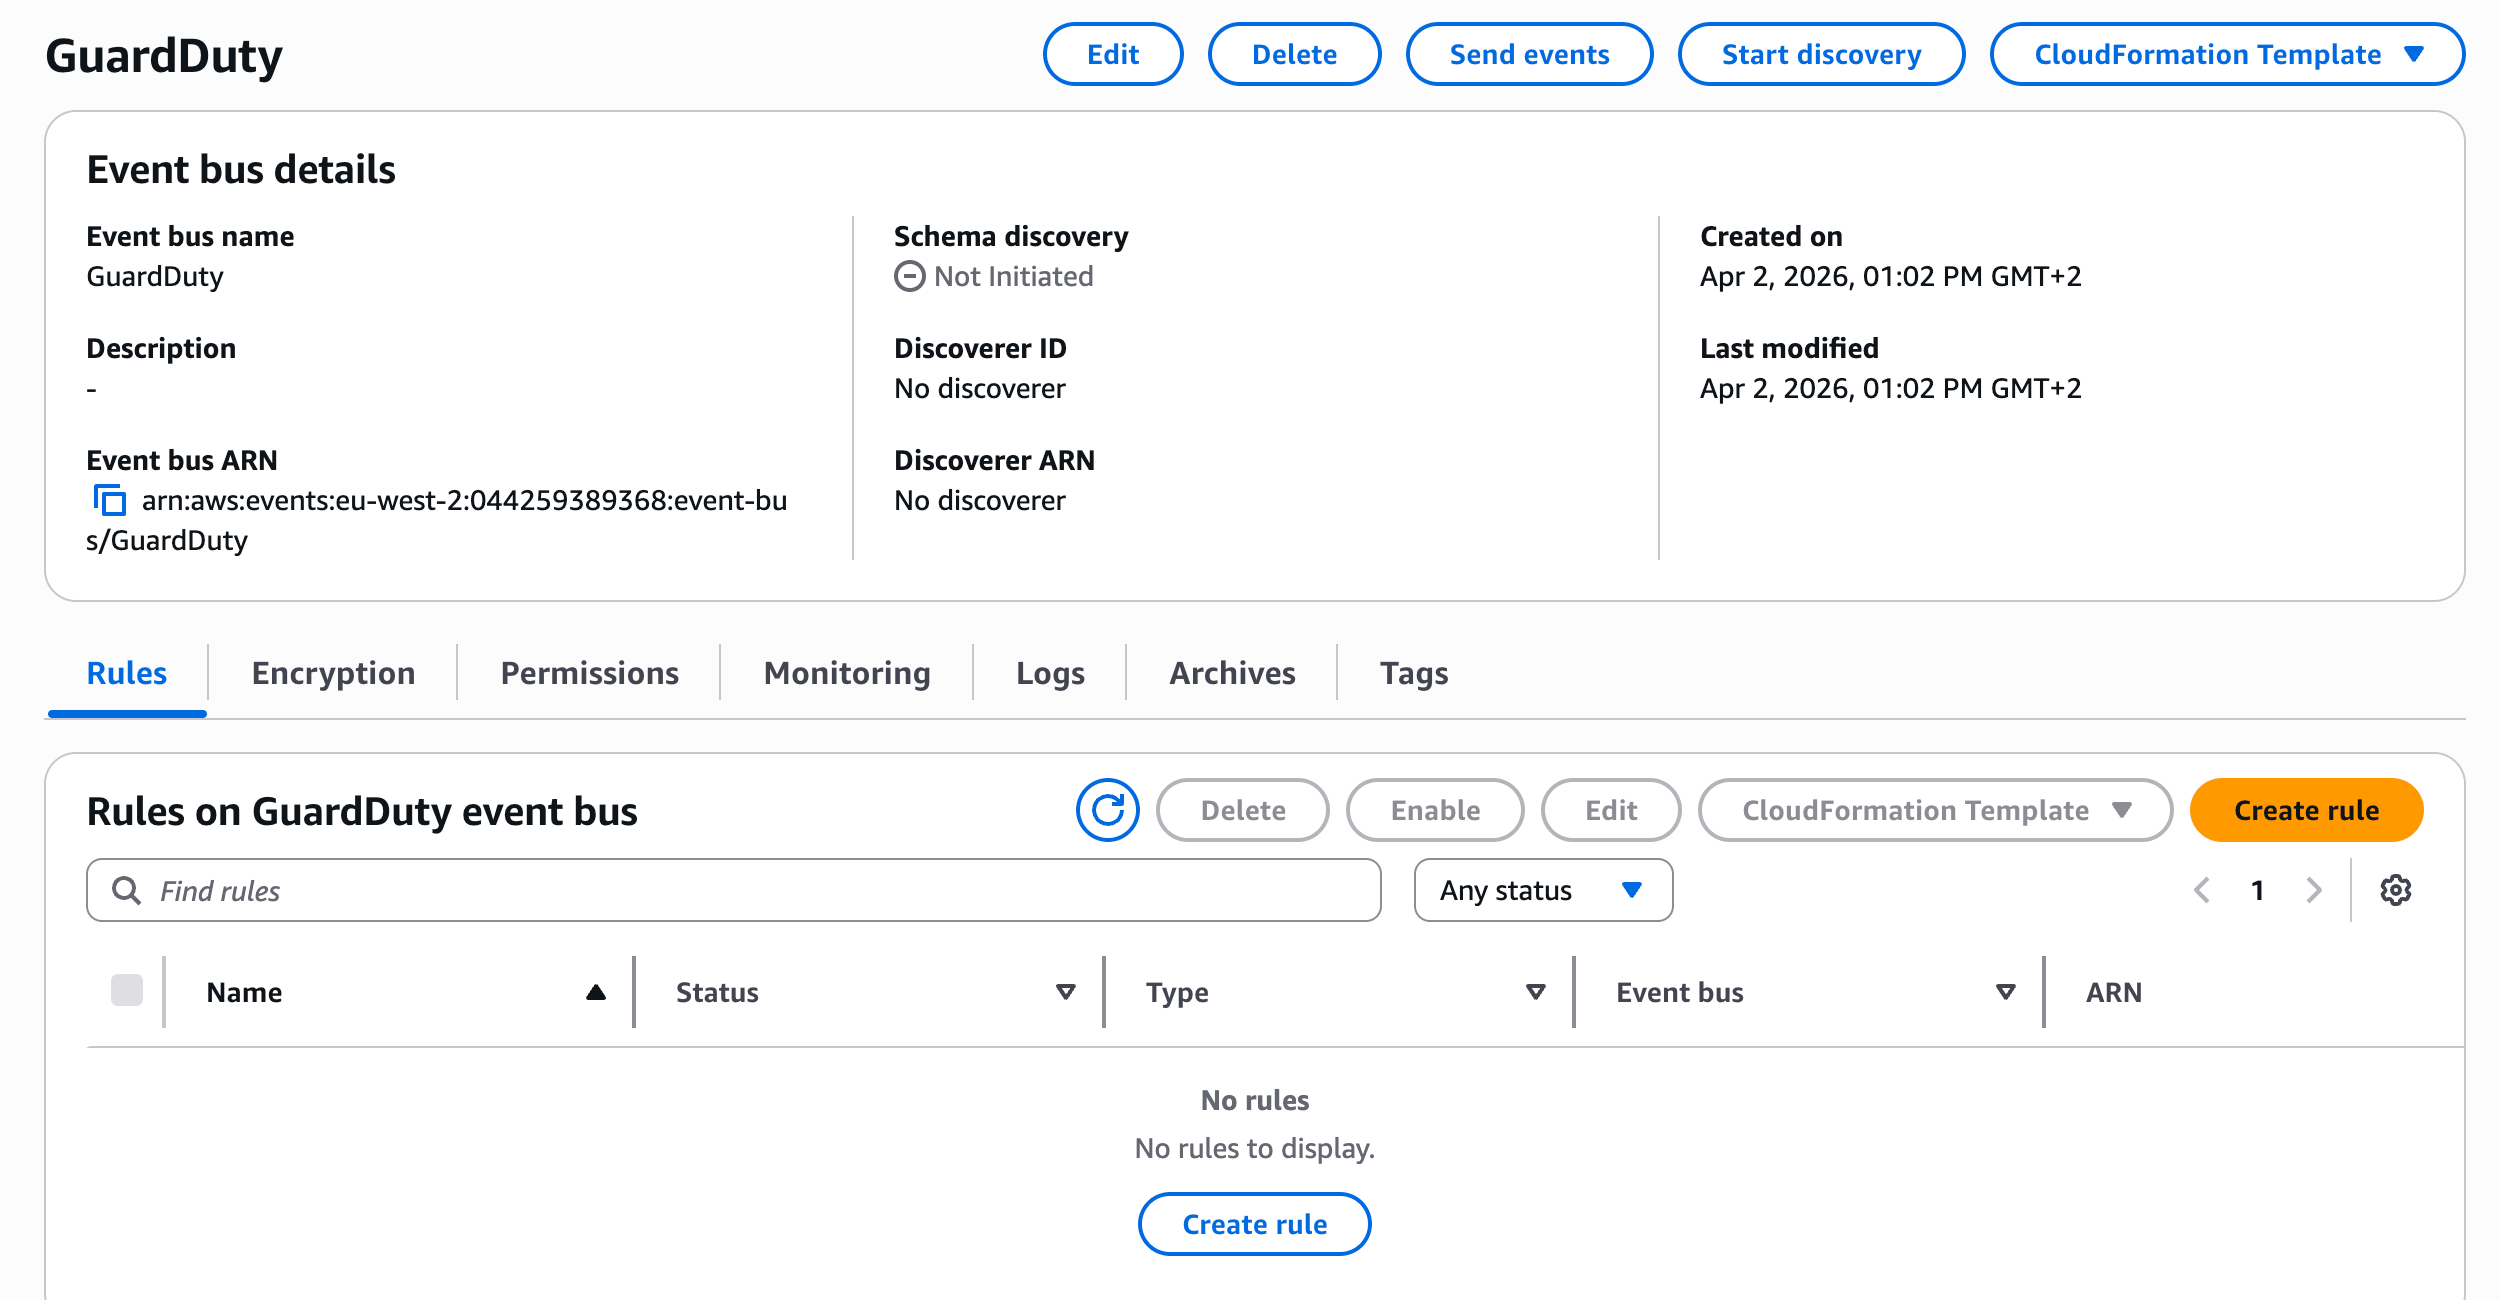
Route GuardDuty findings to Clarion through EventBridge and SNS.
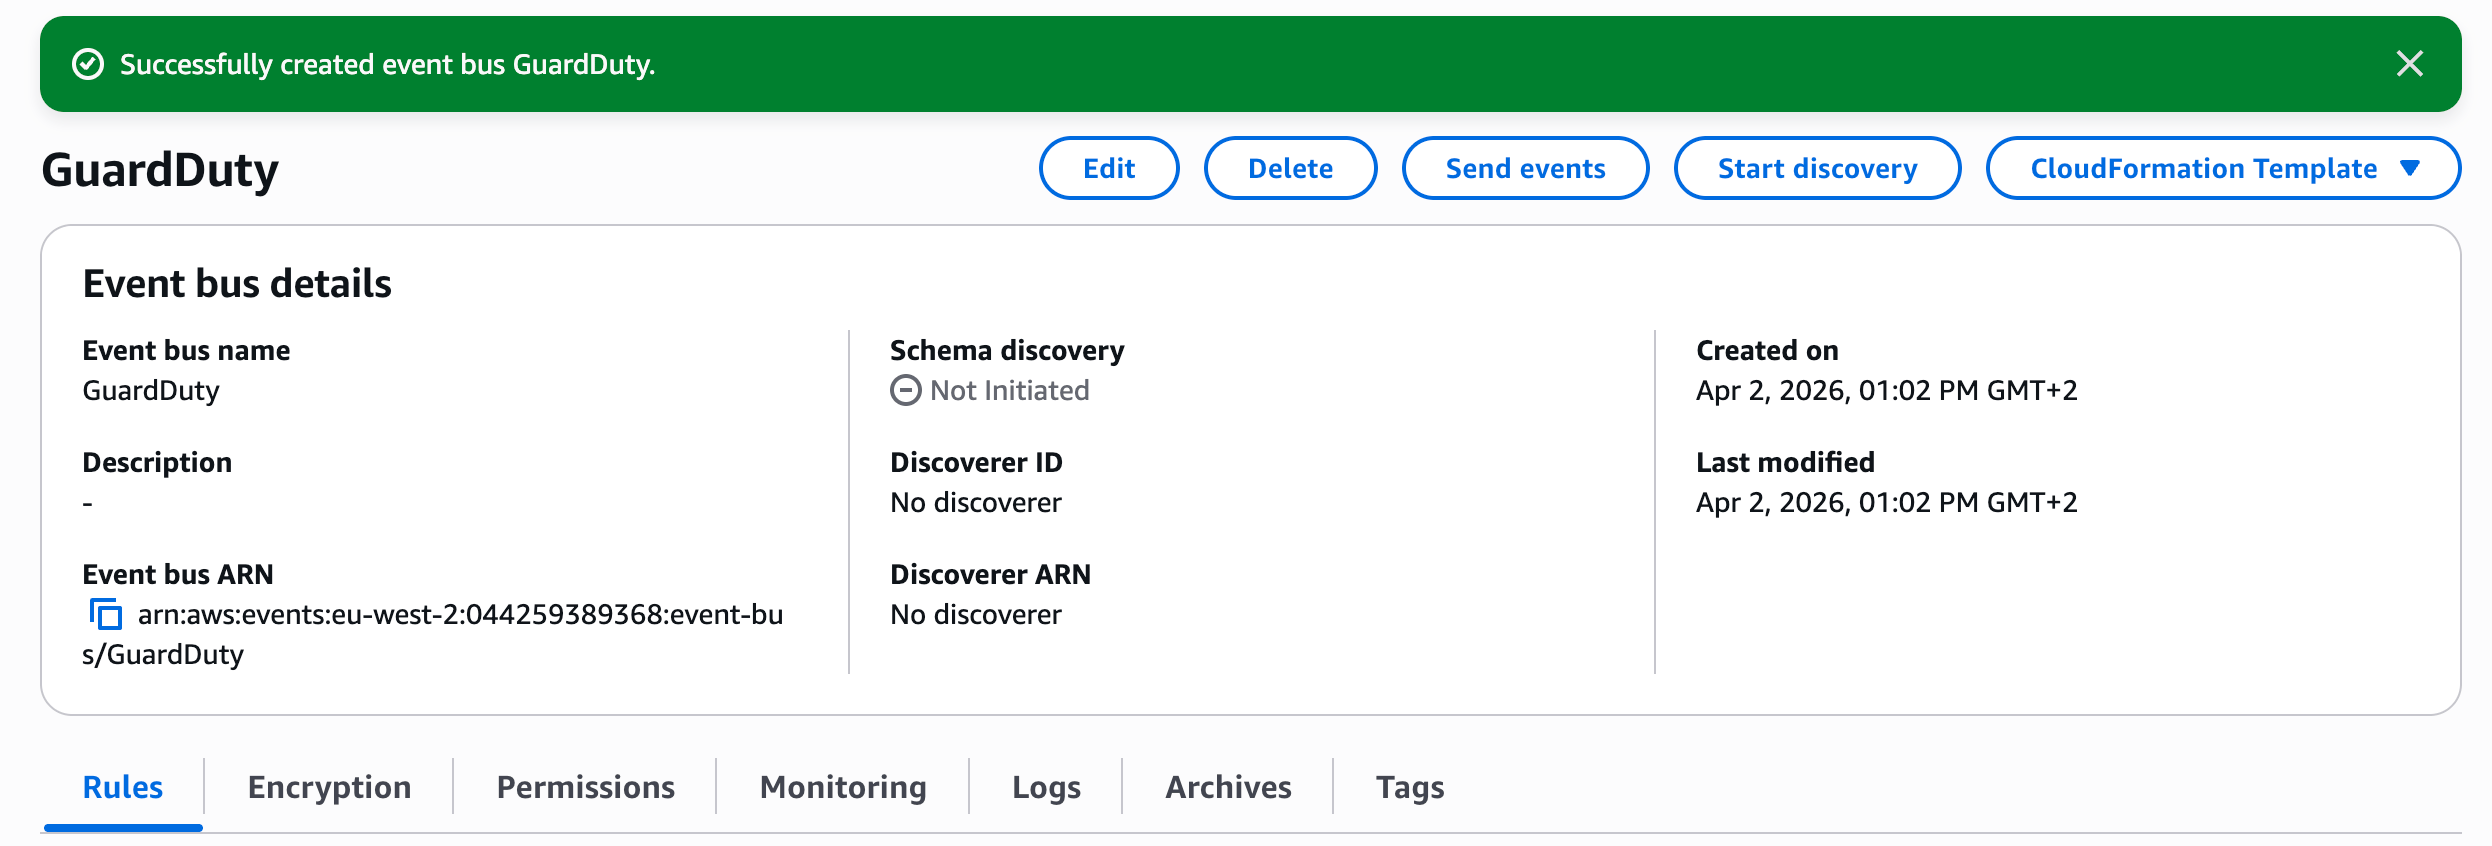
### 3.1 Create an event bus
1. Open the Amazon EventBridge console.
2. You can use the **default** event bus, or create a new custom event bus if you want to isolate GuardDuty events (e.g. `clarion-guardduty-bus`).
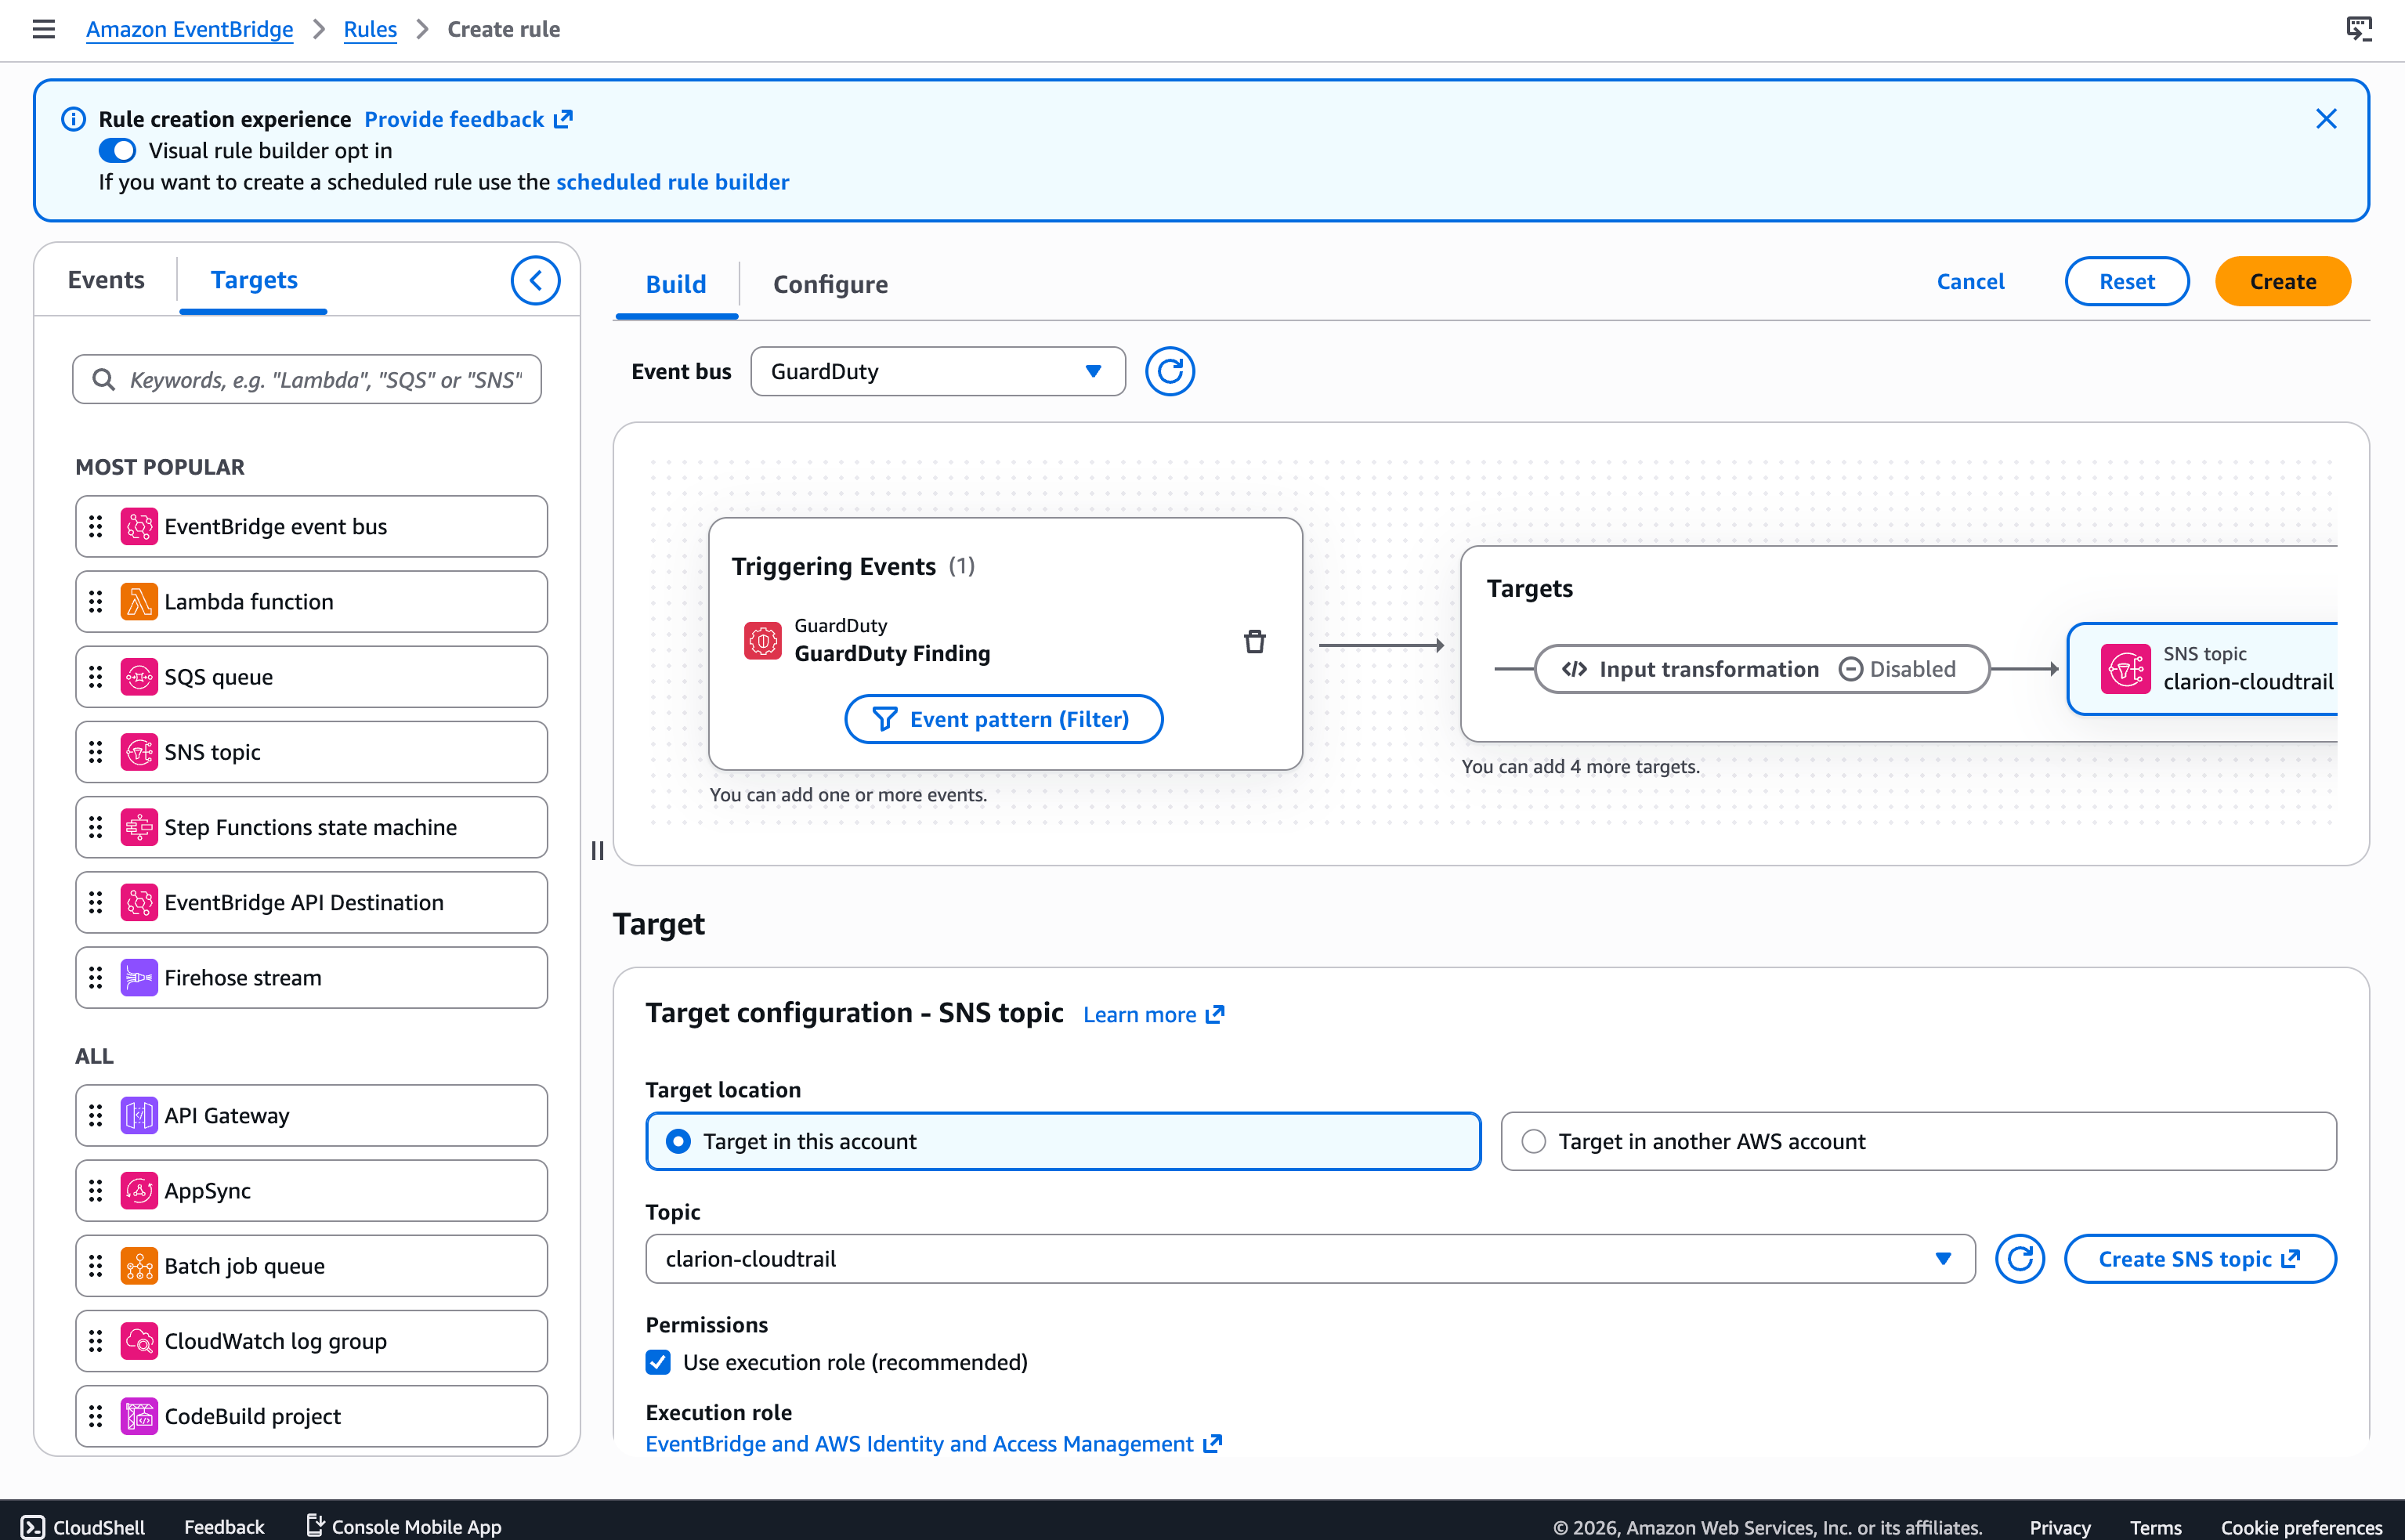
### 3.2 Create an EventBridge rule for GuardDuty
1. Within the event bus, create a new rule.
2. Set the event source to GuardDuty findings.
3. Make sure you're using the following event pattern:
```json theme={null}
{
"source": ["aws.guardduty"],
"detail-type": ["GuardDuty Finding"]
}
```
4. Set the target to the SNS topic you created for Clarion. If you create a dedicated `clarion-guardduty` topic, copy that topic ARN into Clarion's SNS topic ARN field for the GuardDuty monitor and save before creating the HTTPS subscription.
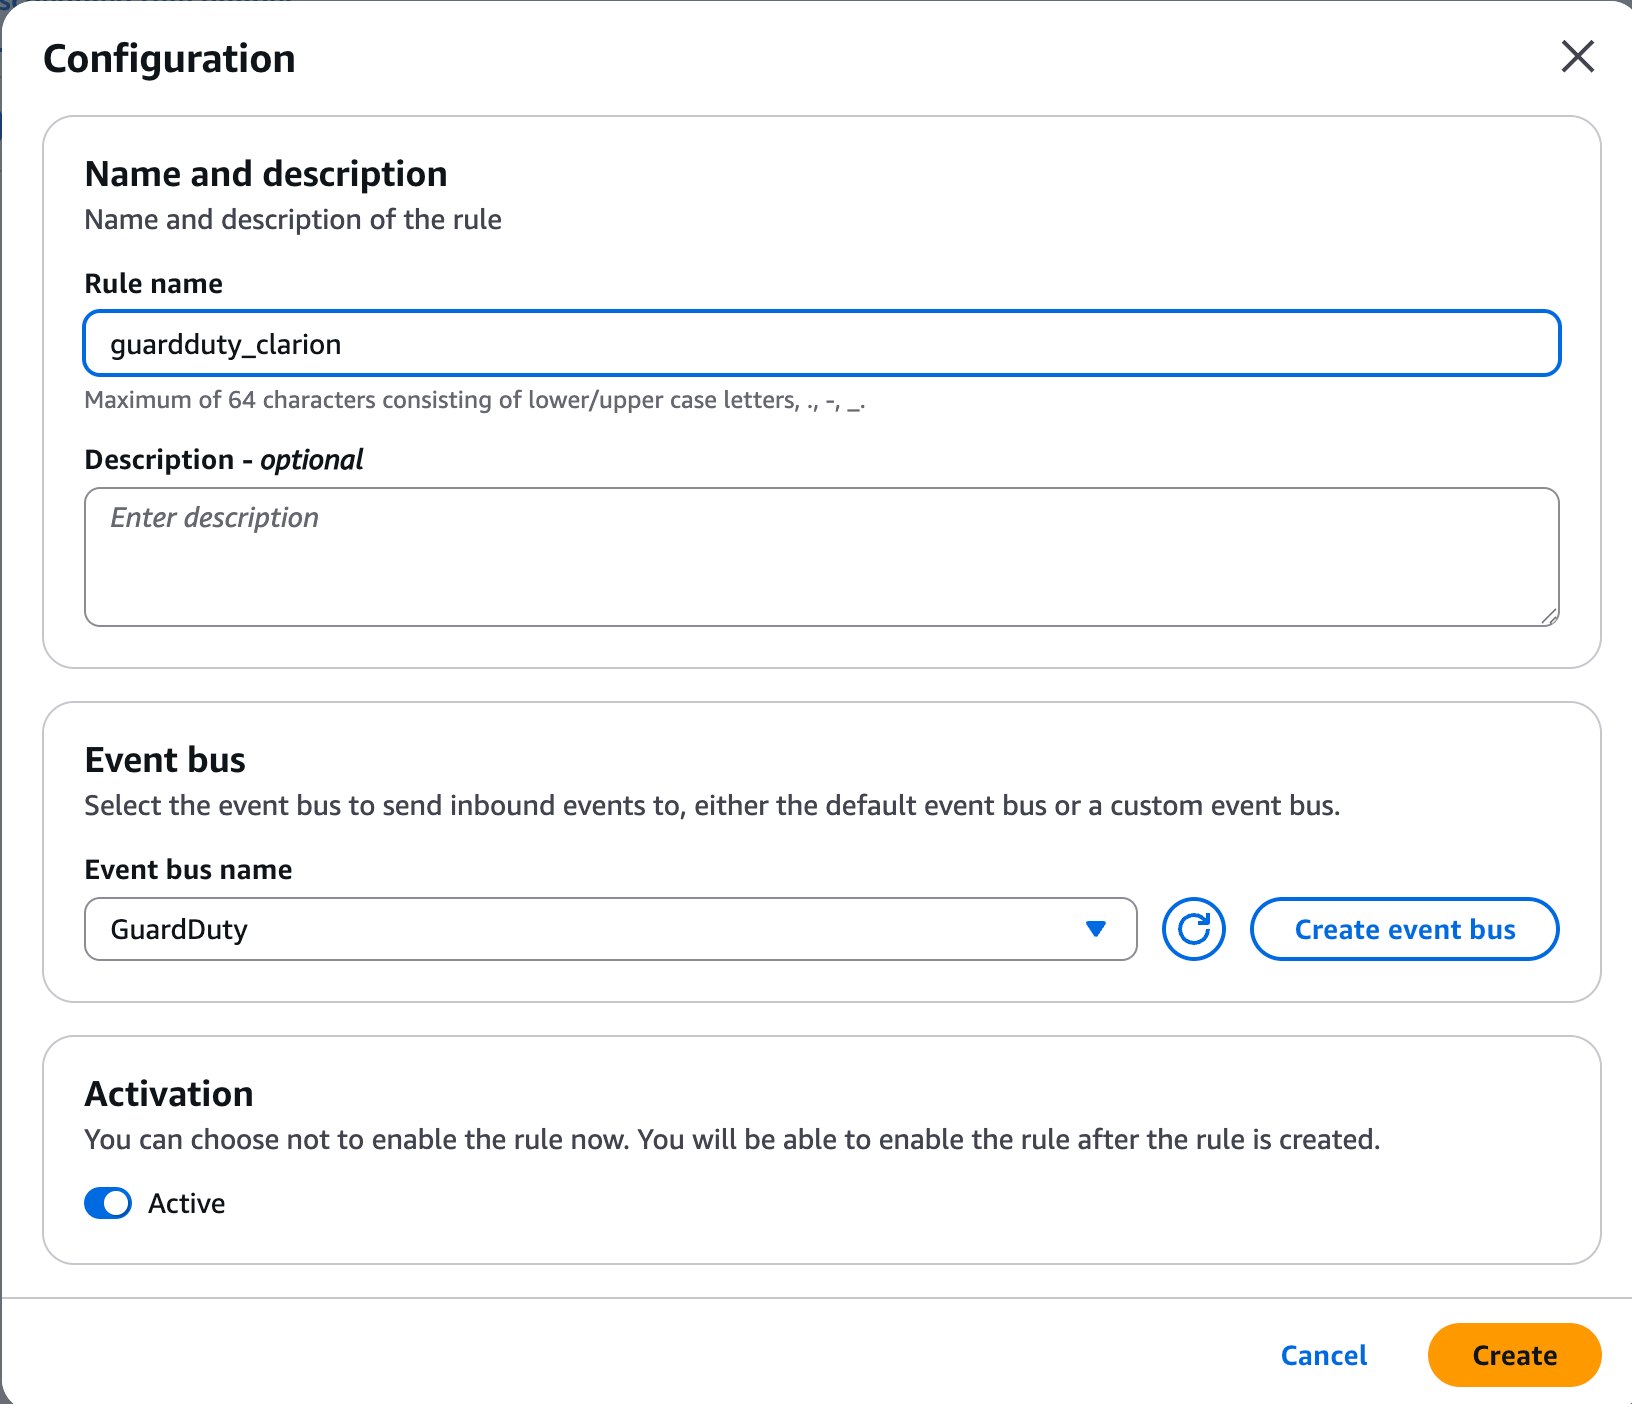
5. Give the rule a descriptive name (e.g. `clarion-guardduty-findings`), review, and save.
```json theme={null}
{
"detail-type": [
"AWS API Call via CloudTrail",
"AWS Console Sign In via CloudTrail",
"AWS Console Signin via CloudTrail",
"AWS Service Event via CloudTrail"
]
}
```
EventBridge detail-type matching is **case-sensitive**. The pattern above
includes both known casing variants of the console sign-in detail-type
(`Sign In` and `Signin`) to ensure events are captured regardless of
the variant your account emits. Do **not** add a `source` filter — the
`source` field varies by originating AWS service (e.g. `aws.iam`,
`aws.ec2`, `aws.signin`) and filtering on it would silently drop events.
These detail-types cover the following CloudTrail event categories:
| Detail type | What it captures | Examples |
| ------------------------------------ | ---------------------------------------- | ---------------------------------------------------------------------- |
| `AWS API Call via CloudTrail` | All management and data API calls | `DeleteUser`, `PutBucketPolicy`, `RunInstances` |
| `AWS Console Sign In via CloudTrail` | Console login and logout events | `ConsoleLogin` (success, failure, MFA) |
| `AWS Service Event via CloudTrail` | Non-API events triggered by AWS services | Log file delivery, automated key rotation, service-linked role actions |
Clarion has signal rules that depend on console sign-in events (login failures,
MFA checks, root account logins, multi-IP detection), so including the
console sign-in detail-types is important for full coverage.
A fourth detail-type, `AWS Insight via CloudTrail`, exists for
[CloudTrail Insights](https://docs.aws.amazon.com/awscloudtrail/latest/userguide/logging-insights-events-with-cloudtrail.html)
anomaly detection events. Add it to the pattern if you have Insights enabled
on your trail.
3. Set the target of the rule to the SNS topic you created (`clarion-cloudtrail`).
***
## Step 1B — CloudTrail via Consolidated S3 Logging
An [AWS Organizations trail](https://docs.aws.amazon.com/awscloudtrail/latest/userguide/creating-trail-organization.html) writes CloudTrail events from every member account and region into a single S3 bucket — typically a dedicated log-archive account. Clarion subscribes to that bucket's S3 event notifications, fetches each new log file, and creates one signal per CloudTrail record. One SNS topic and one Clarion subscription cover the whole organization.
For this consolidated S3 path, Clarion must be able to read each CloudTrail log object from S3. See [CloudTrail via existing S3 bucket](/integrations/aws/cloudtrail-s3) for the required IAM setup.
### 1B.1 Place the Clarion IAM role in the log-archive account
Configure the Clarion IAM role from Step 4 **in the account that owns the consolidated CloudTrail bucket** — usually the AWS Organizations log-archive account. The role needs S3 read access to the CloudTrail log objects.
### 1B.2 Create an SNS topic for S3 notifications
1. In the log-archive account, open the SNS console and create a **Standard** topic in the same region as the consolidated log bucket (e.g. `clarion-cloudtrail-s3`).
2. Copy the topic ARN, add it to Clarion's **SNS topic ARN** list on the CloudTrail monitor, and save.
S3 event notifications deliver only to SNS topics in the same region as the bucket.
### 1B.3 Subscribe Clarion to the topic
1. On the topic, click **Create subscription**.
2. Set the protocol to **HTTPS** and paste the webhook URL from Step 0.
3. Clarion auto-confirms the subscription.
### 1B.4 Configure S3 event notifications on the bucket
1. In the log-archive account, open the consolidated CloudTrail bucket in the S3 console.
2. Go to **Properties → Event notifications → Create event notification**.
3. Restrict the trigger to the CloudTrail prefix (e.g. `AWSLogs/`) and suffix `.json.gz`.
4. Event types: **All object create events** (`s3:ObjectCreated:*`).
5. Destination: **SNS topic**, then select the topic from 1B.2.
### 1B.5 (SSE-KMS only) Allow the Clarion role to use the bucket's KMS key
If the consolidated log bucket uses SSE-KMS, the CMK's key policy must allow the Clarion IAM role from Step 4 to call `kms:Decrypt`. Keys created through the CloudTrail setup wizard delegate to IAM by default, in which case Clarion's role policy is sufficient and no key-policy change is needed. Otherwise, add the following statement to the CMK's key policy, replacing ``:
```json theme={null}
{
"Sid": "AllowClarionDecrypt",
"Effect": "Allow",
"Principal": { "AWS": "" },
"Action": "kms:Decrypt",
"Resource": "*"
}
```
***
## Step 2 — CloudWatch Alarms
Send CloudWatch alarm state changes to Clarion by publishing to an SNS topic subscribed to your webhook URL.
1. Create a new SNS **Standard** topic for CloudWatch alarms (e.g. `clarion-cloudwatch`), or reuse a topic you have already registered in Clarion.
2. Copy the topic ARN, paste it into Clarion's SNS topic ARN field for the CloudWatch monitor, and save the monitor.
3. Add an **HTTPS** subscription using the webhook URL from Clarion. Wait for Clarion to auto-confirm.
4. In the CloudWatch console, open the alarm(s) you want Clarion to monitor.
5. Edit the alarm's notification actions and set it to publish to the SNS topic you created.
You can point multiple alarms at the same SNS topic — no need to create one per alarm.
***
## Step 3 — GuardDuty Findings
Route GuardDuty findings to Clarion through EventBridge and SNS.
### 3.1 Create an event bus
1. Open the Amazon EventBridge console.
2. You can use the **default** event bus, or create a new custom event bus if you want to isolate GuardDuty events (e.g. `clarion-guardduty-bus`).
### 3.2 Create an EventBridge rule for GuardDuty
1. Within the event bus, create a new rule.
2. Set the event source to GuardDuty findings.
3. Make sure you're using the following event pattern:
```json theme={null}
{
"source": ["aws.guardduty"],
"detail-type": ["GuardDuty Finding"]
}
```
4. Set the target to the SNS topic you created for Clarion. If you create a dedicated `clarion-guardduty` topic, copy that topic ARN into Clarion's SNS topic ARN field for the GuardDuty monitor and save before creating the HTTPS subscription.
5. Give the rule a descriptive name (e.g. `clarion-guardduty-findings`), review, and save.
 Make sure GuardDuty is enabled in your AWS account. If it's not yet active, enable it in the GuardDuty console first.
***
## Step 4 — IAM Role for Agent Tools
Clarion needs an IAM role to run agent tools (CloudTrail lookup, Route 53, CloudWatch queries). You can set this up via the AWS Console or the AWS CLI.
The generated policy uses `Resource: "*"` on every statement for convenience. Before production, deselect any permission sets you don't use and replace `"*"` with specific ARNs for your resources, such as SNS topics, S3 log buckets, Route 53 zones, and CloudWatch log groups. Expand each permission set in Clarion's permission picker for per-set scope-down guidance.
***
### Option A — AWS Console
#### 1. Check for an existing role
Make sure GuardDuty is enabled in your AWS account. If it's not yet active, enable it in the GuardDuty console first.
***
## Step 4 — IAM Role for Agent Tools
Clarion needs an IAM role to run agent tools (CloudTrail lookup, Route 53, CloudWatch queries). You can set this up via the AWS Console or the AWS CLI.
The generated policy uses `Resource: "*"` on every statement for convenience. Before production, deselect any permission sets you don't use and replace `"*"` with specific ARNs for your resources, such as SNS topics, S3 log buckets, Route 53 zones, and CloudWatch log groups. Expand each permission set in Clarion's permission picker for per-set scope-down guidance.
***
### Option A — AWS Console
#### 1. Check for an existing role
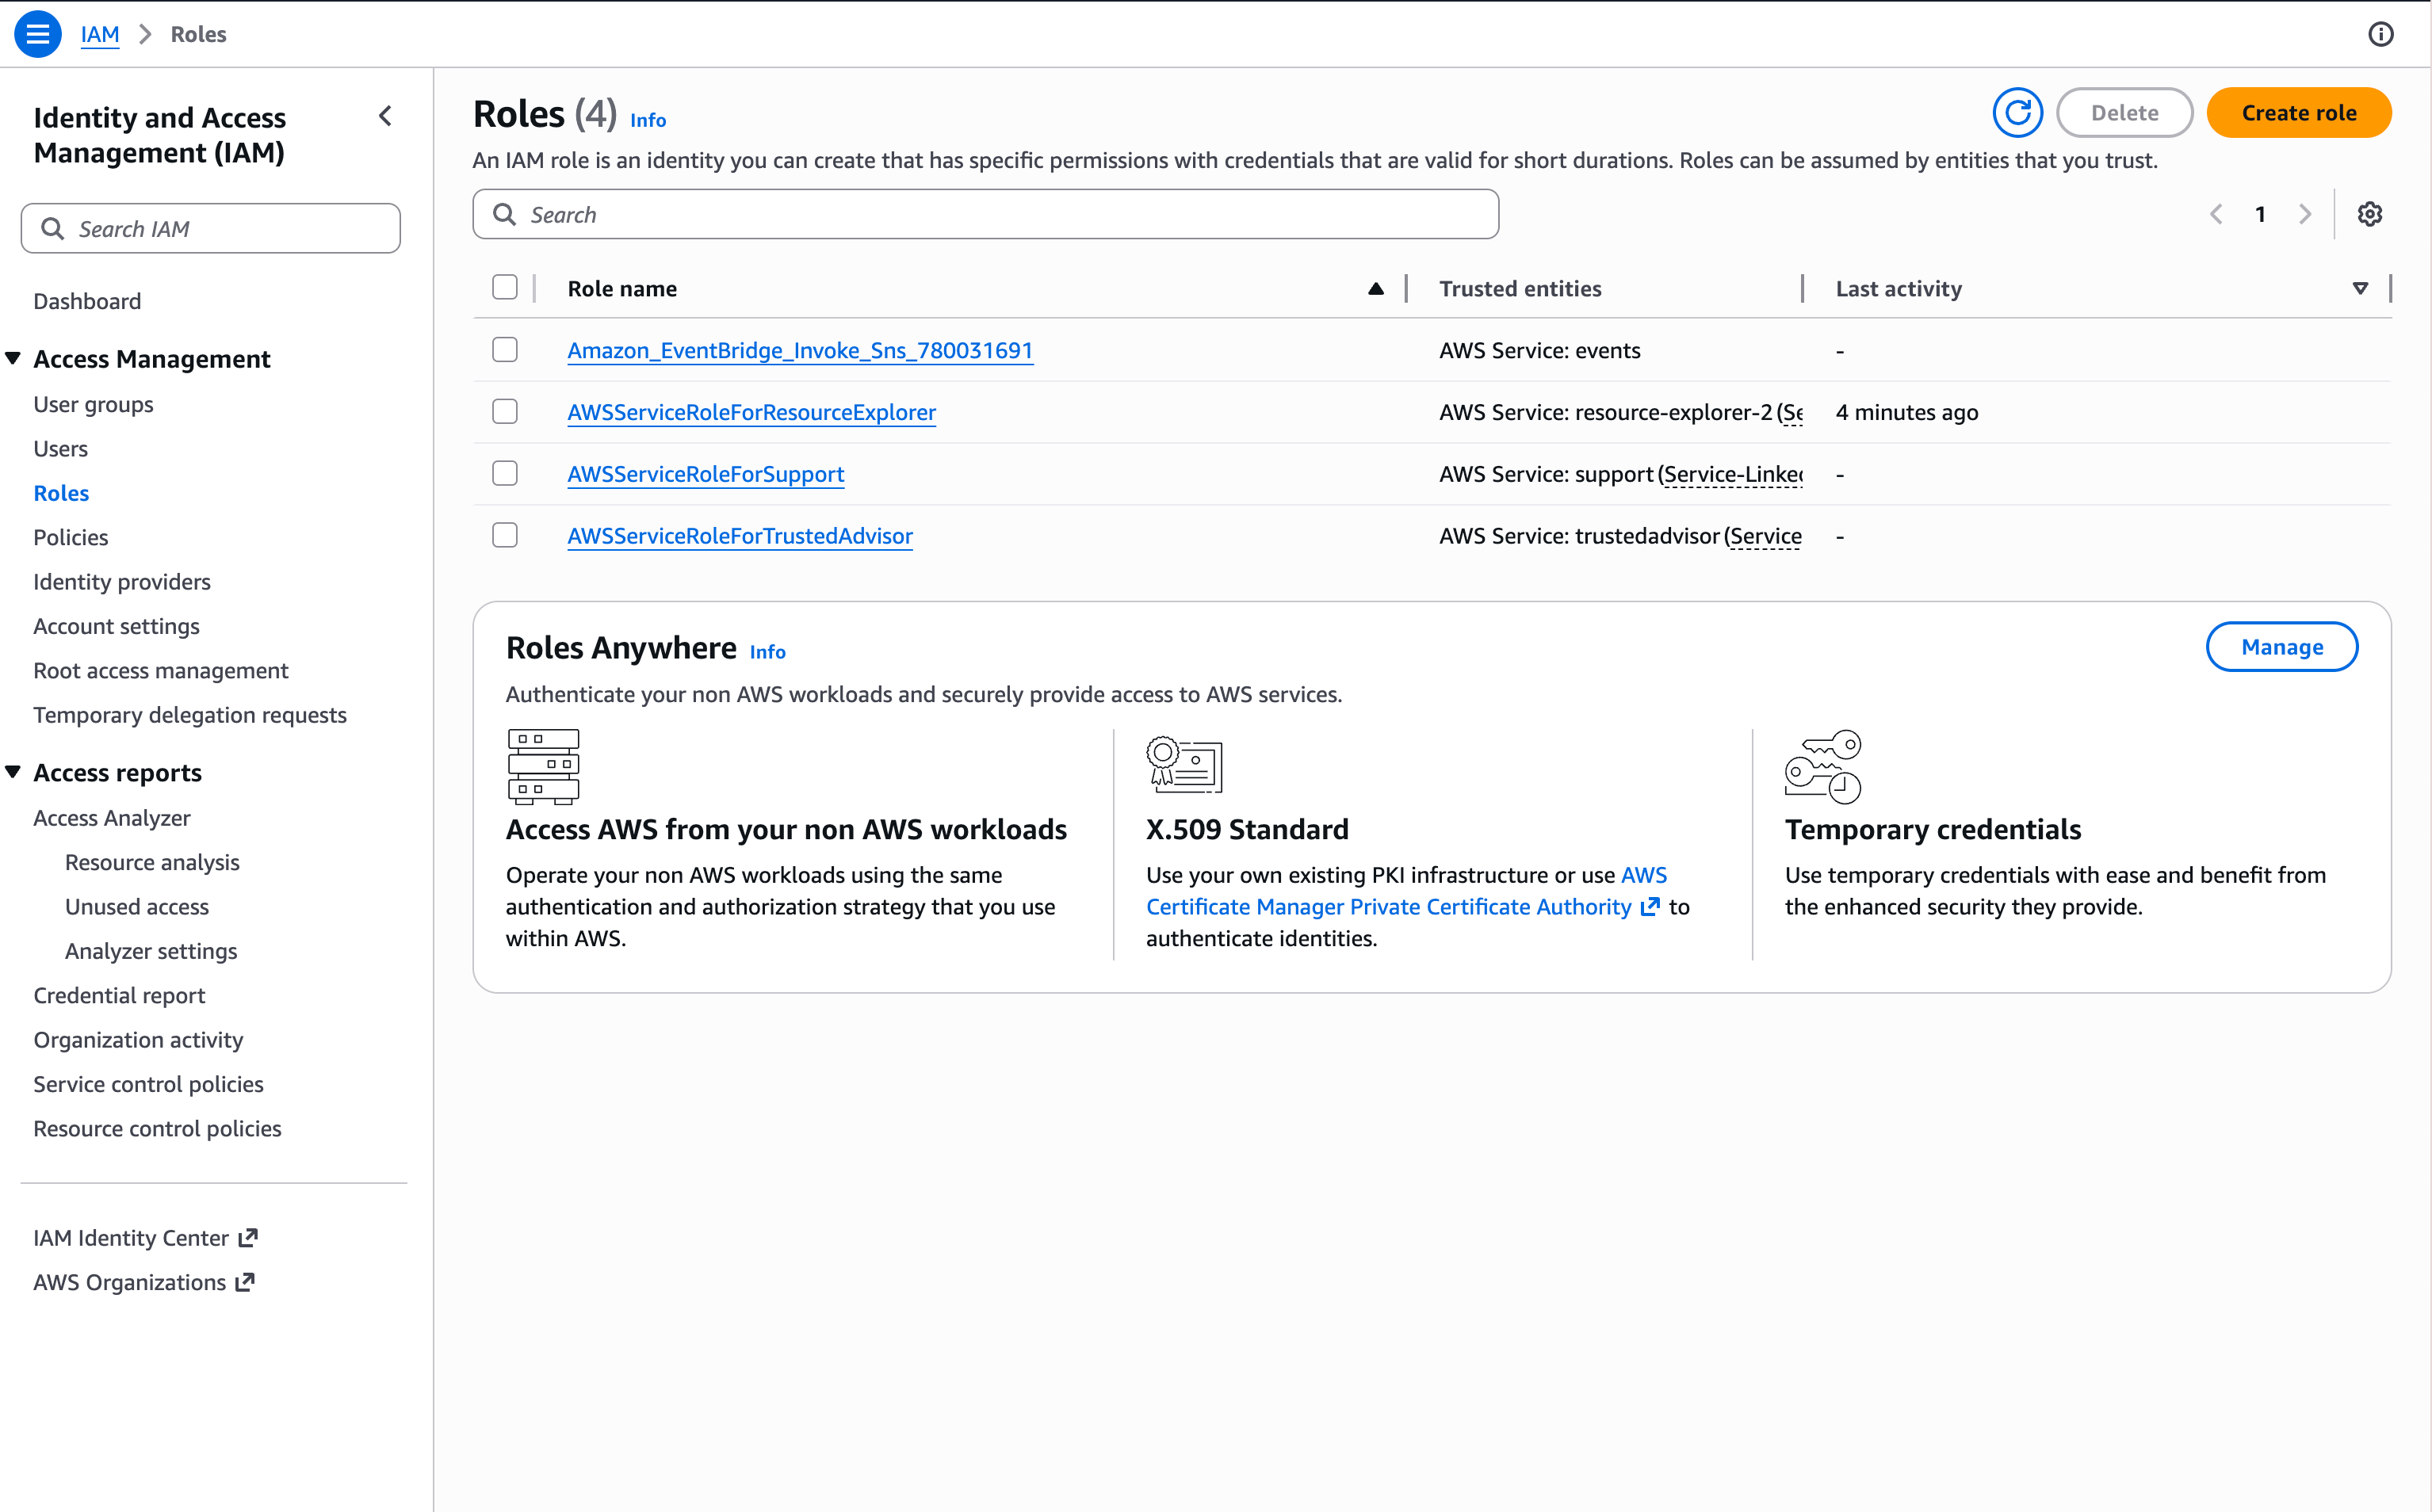 Go to **IAM console** > **Roles** and search for `ClarionIntegrationRole`. If it exists, skip to step 3 to update the trust policy.
#### 2. Create the policy and role
1. Go to **IAM console** > **Policies** and create a new policy with the JSON below.
2. Then go to **IAM console** > **Roles** and create a new role.
3. Select **Custom trust policy** and paste the trust policy JSON below.
4. Attach the policy you just created.
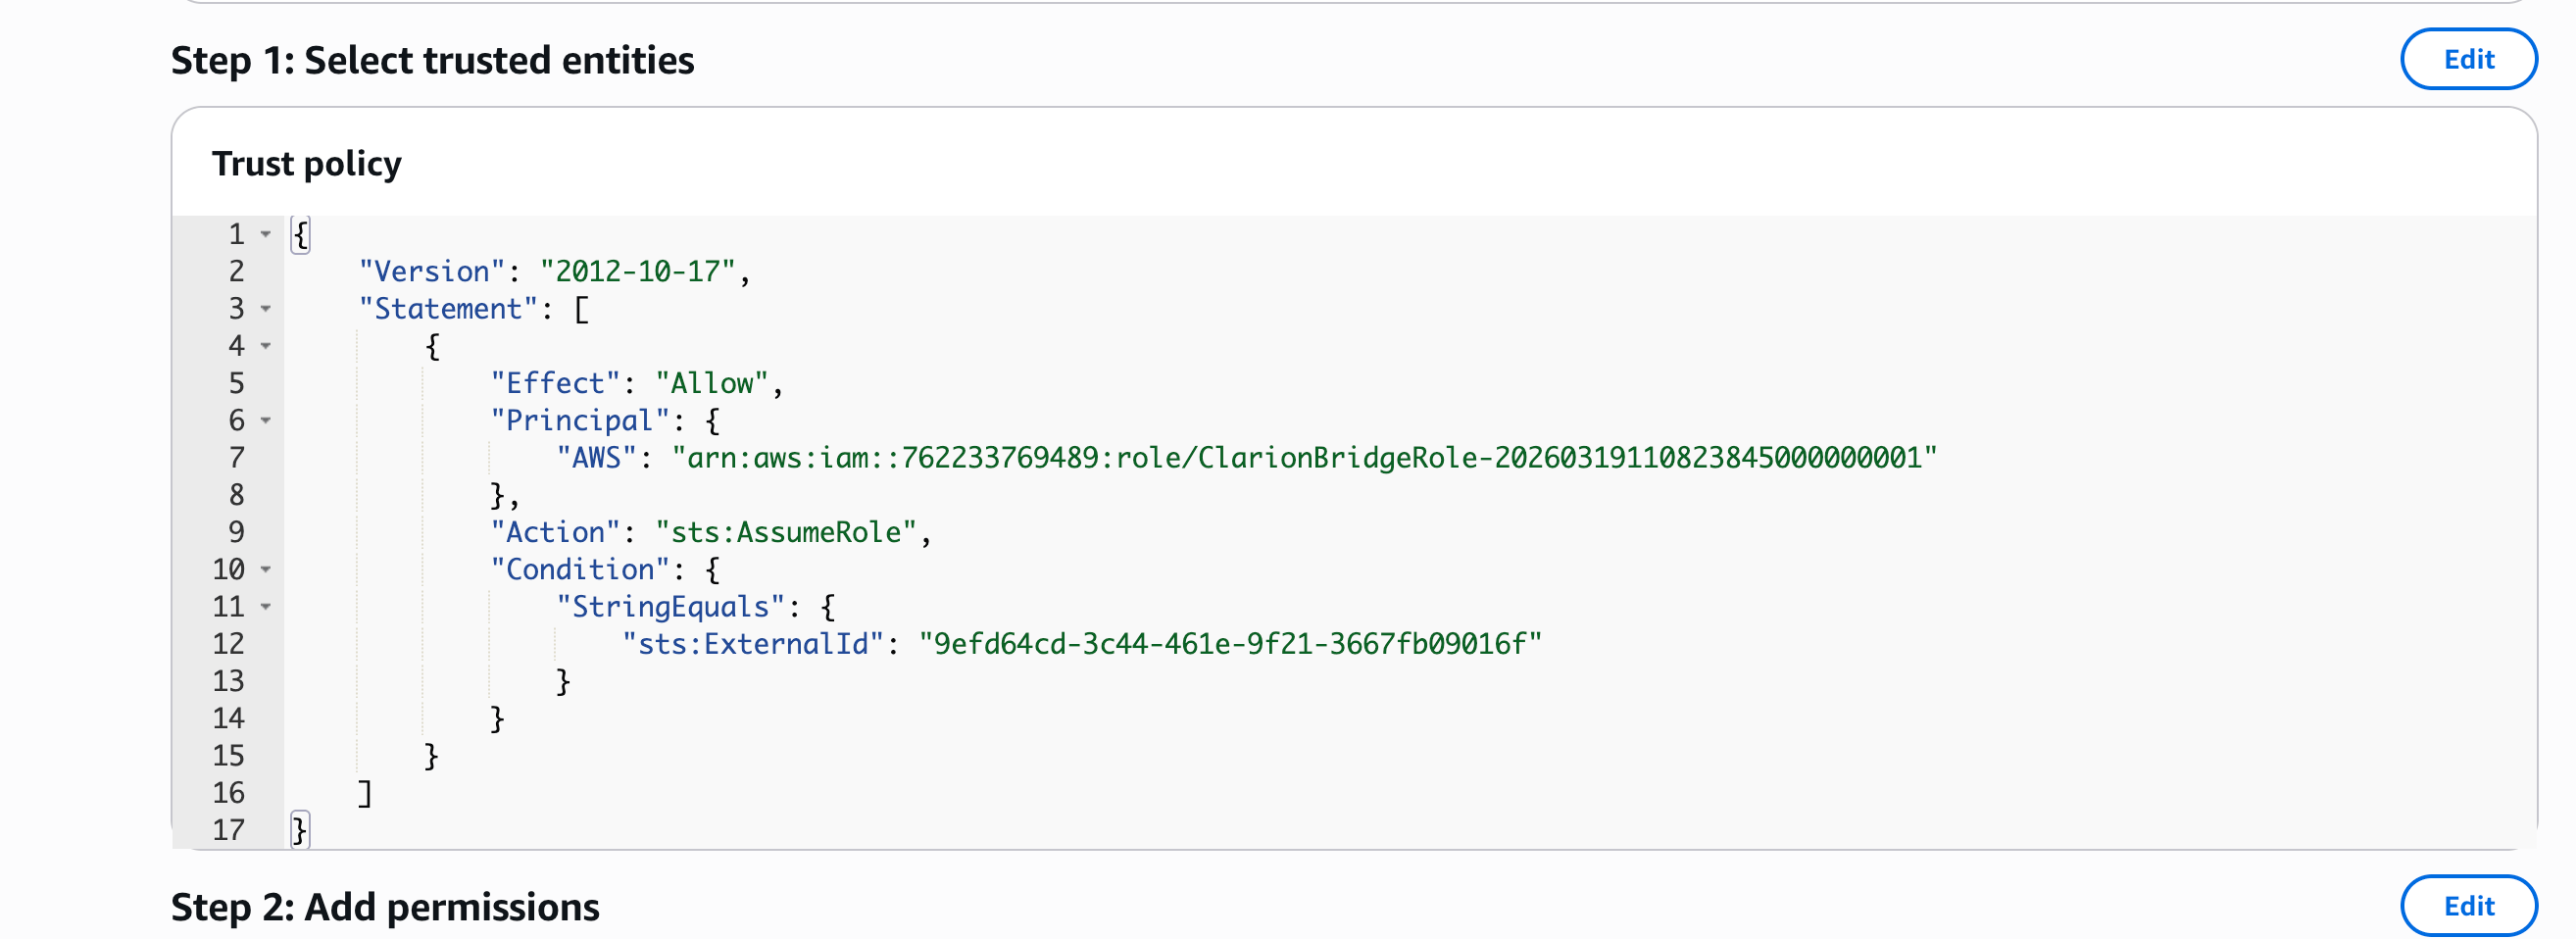
#### 3. Verify or update the trust policy
1. Open the role's **Trust relationships** tab.
2. Verify (or update) the trust policy to match:
Trust Policy
```json theme={null}
{
"Version": "2012-10-17",
"Statement": [
{
"Effect": "Allow",
"Principal": {
"AWS": "arn:aws:iam::762233769489:role/ClarionBridgeRole-20260319110823845000000001"
},
"Action": "sts:AssumeRole",
"Condition": {
"StringEquals": {
"sts:ExternalId": ""
}
}
}
]
}
```
#### 4. Copy the Role ARN
Go to **IAM console** > **Roles** and search for `ClarionIntegrationRole`. If it exists, skip to step 3 to update the trust policy.
#### 2. Create the policy and role
1. Go to **IAM console** > **Policies** and create a new policy with the JSON below.
2. Then go to **IAM console** > **Roles** and create a new role.
3. Select **Custom trust policy** and paste the trust policy JSON below.
4. Attach the policy you just created.
#### 3. Verify or update the trust policy
1. Open the role's **Trust relationships** tab.
2. Verify (or update) the trust policy to match:
Trust Policy
```json theme={null}
{
"Version": "2012-10-17",
"Statement": [
{
"Effect": "Allow",
"Principal": {
"AWS": "arn:aws:iam::762233769489:role/ClarionBridgeRole-20260319110823845000000001"
},
"Action": "sts:AssumeRole",
"Condition": {
"StringEquals": {
"sts:ExternalId": ""
}
}
}
]
}
```
#### 4. Copy the Role ARN
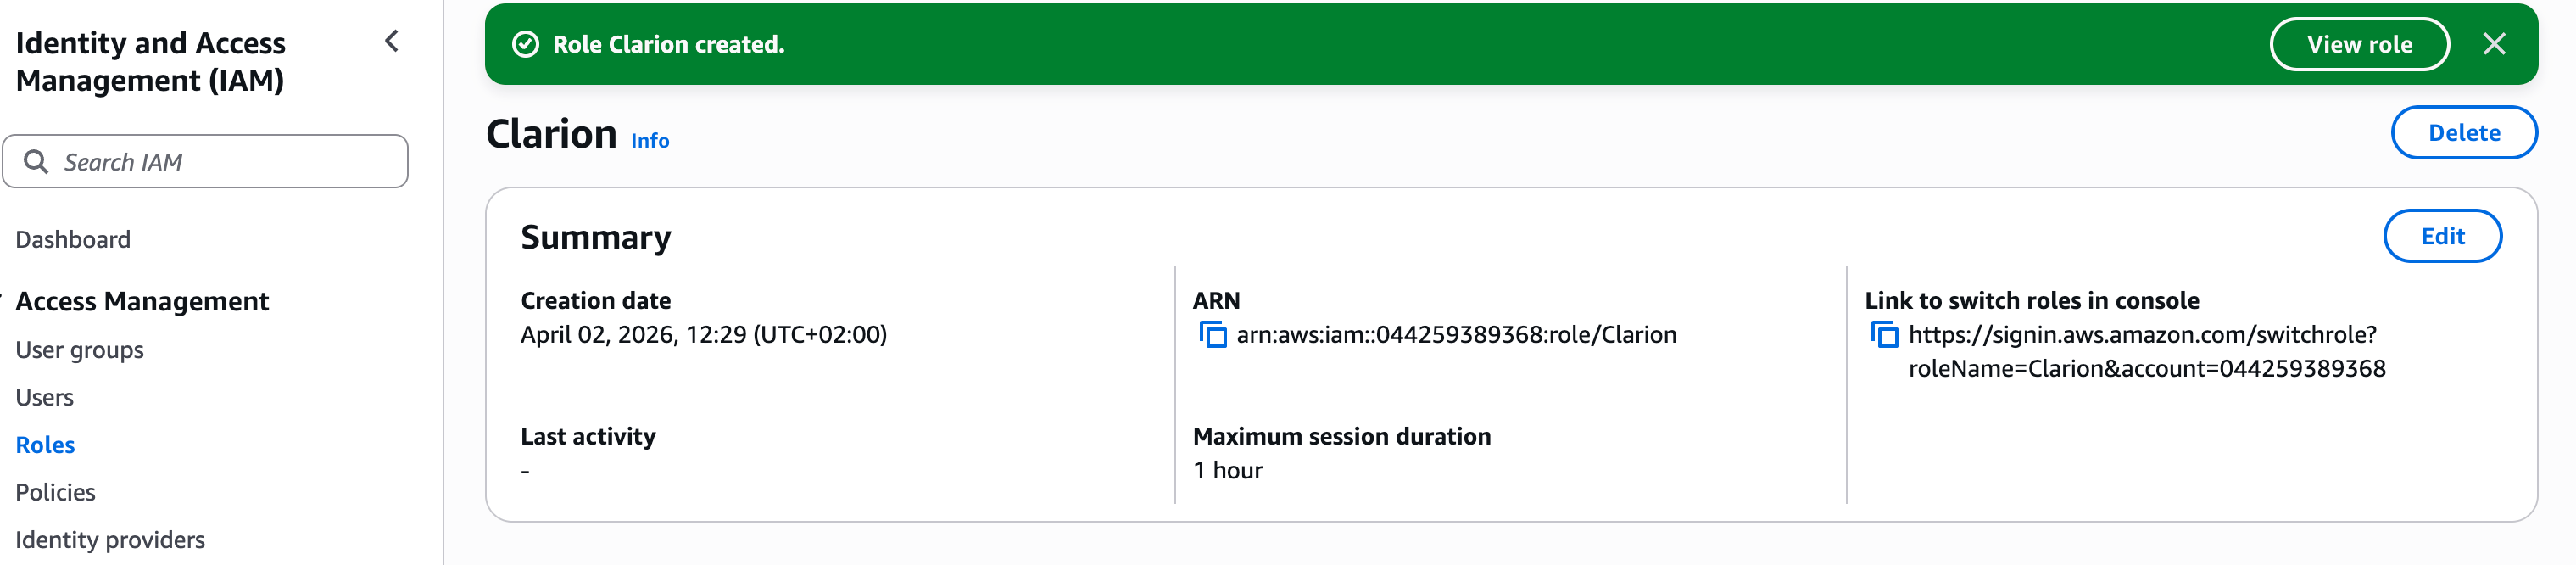 Verify the permission policy is attached, then copy the **Role ARN** and paste it into Clarion.
***
### Option B — AWS CLI
IAM Permission Policy
```json theme={null}
{
"Version": "2012-10-17",
"Statement": [
{
"Sid": "ClarionRoute53",
"Effect": "Allow",
"Action": [
"route53:ListHostedZones",
"route53:GetHostedZone",
"route53:ListResourceRecordSets",
"route53:ChangeResourceRecordSets"
],
"Resource": "*"
},
{
"Sid": "ClarionCloudWatch",
"Effect": "Allow",
"Action": [
"cloudwatch:ListMetrics",
"cloudwatch:DescribeAlarms",
"cloudwatch:GetMetricData"
],
"Resource": "*"
},
{
"Sid": "ClarionCloudTrail",
"Effect": "Allow",
"Action": [
"cloudtrail:LookupEvents",
"cloudtrail:DescribeTrails",
"cloudtrail:GetTrailStatus"
],
"Resource": "*"
},
{
"Sid": "ClarionSNS",
"Effect": "Allow",
"Action": [
"sns:CreateTopic",
"sns:DeleteTopic",
"sns:Subscribe",
"sns:Unsubscribe",
"sns:SetTopicAttributes",
"sns:ListTopics",
"sns:GetTopicAttributes",
"sns:ListSubscriptionsByTopic"
],
"Resource": "*"
},
{
"Sid": "ClarionEventBridge",
"Effect": "Allow",
"Action": [
"events:PutRule",
"events:DeleteRule",
"events:PutTargets",
"events:RemoveTargets",
"events:ListRules",
"events:DescribeRule"
],
"Resource": "*"
}
]
}
```
Verify the permission policy is attached, then copy the **Role ARN** and paste it into Clarion.
***
### Option B — AWS CLI
IAM Permission Policy
```json theme={null}
{
"Version": "2012-10-17",
"Statement": [
{
"Sid": "ClarionRoute53",
"Effect": "Allow",
"Action": [
"route53:ListHostedZones",
"route53:GetHostedZone",
"route53:ListResourceRecordSets",
"route53:ChangeResourceRecordSets"
],
"Resource": "*"
},
{
"Sid": "ClarionCloudWatch",
"Effect": "Allow",
"Action": [
"cloudwatch:ListMetrics",
"cloudwatch:DescribeAlarms",
"cloudwatch:GetMetricData"
],
"Resource": "*"
},
{
"Sid": "ClarionCloudTrail",
"Effect": "Allow",
"Action": [
"cloudtrail:LookupEvents",
"cloudtrail:DescribeTrails",
"cloudtrail:GetTrailStatus"
],
"Resource": "*"
},
{
"Sid": "ClarionSNS",
"Effect": "Allow",
"Action": [
"sns:CreateTopic",
"sns:DeleteTopic",
"sns:Subscribe",
"sns:Unsubscribe",
"sns:SetTopicAttributes",
"sns:ListTopics",
"sns:GetTopicAttributes",
"sns:ListSubscriptionsByTopic"
],
"Resource": "*"
},
{
"Sid": "ClarionEventBridge",
"Effect": "Allow",
"Action": [
"events:PutRule",
"events:DeleteRule",
"events:PutTargets",
"events:RemoveTargets",
"events:ListRules",
"events:DescribeRule"
],
"Resource": "*"
}
]
}
```
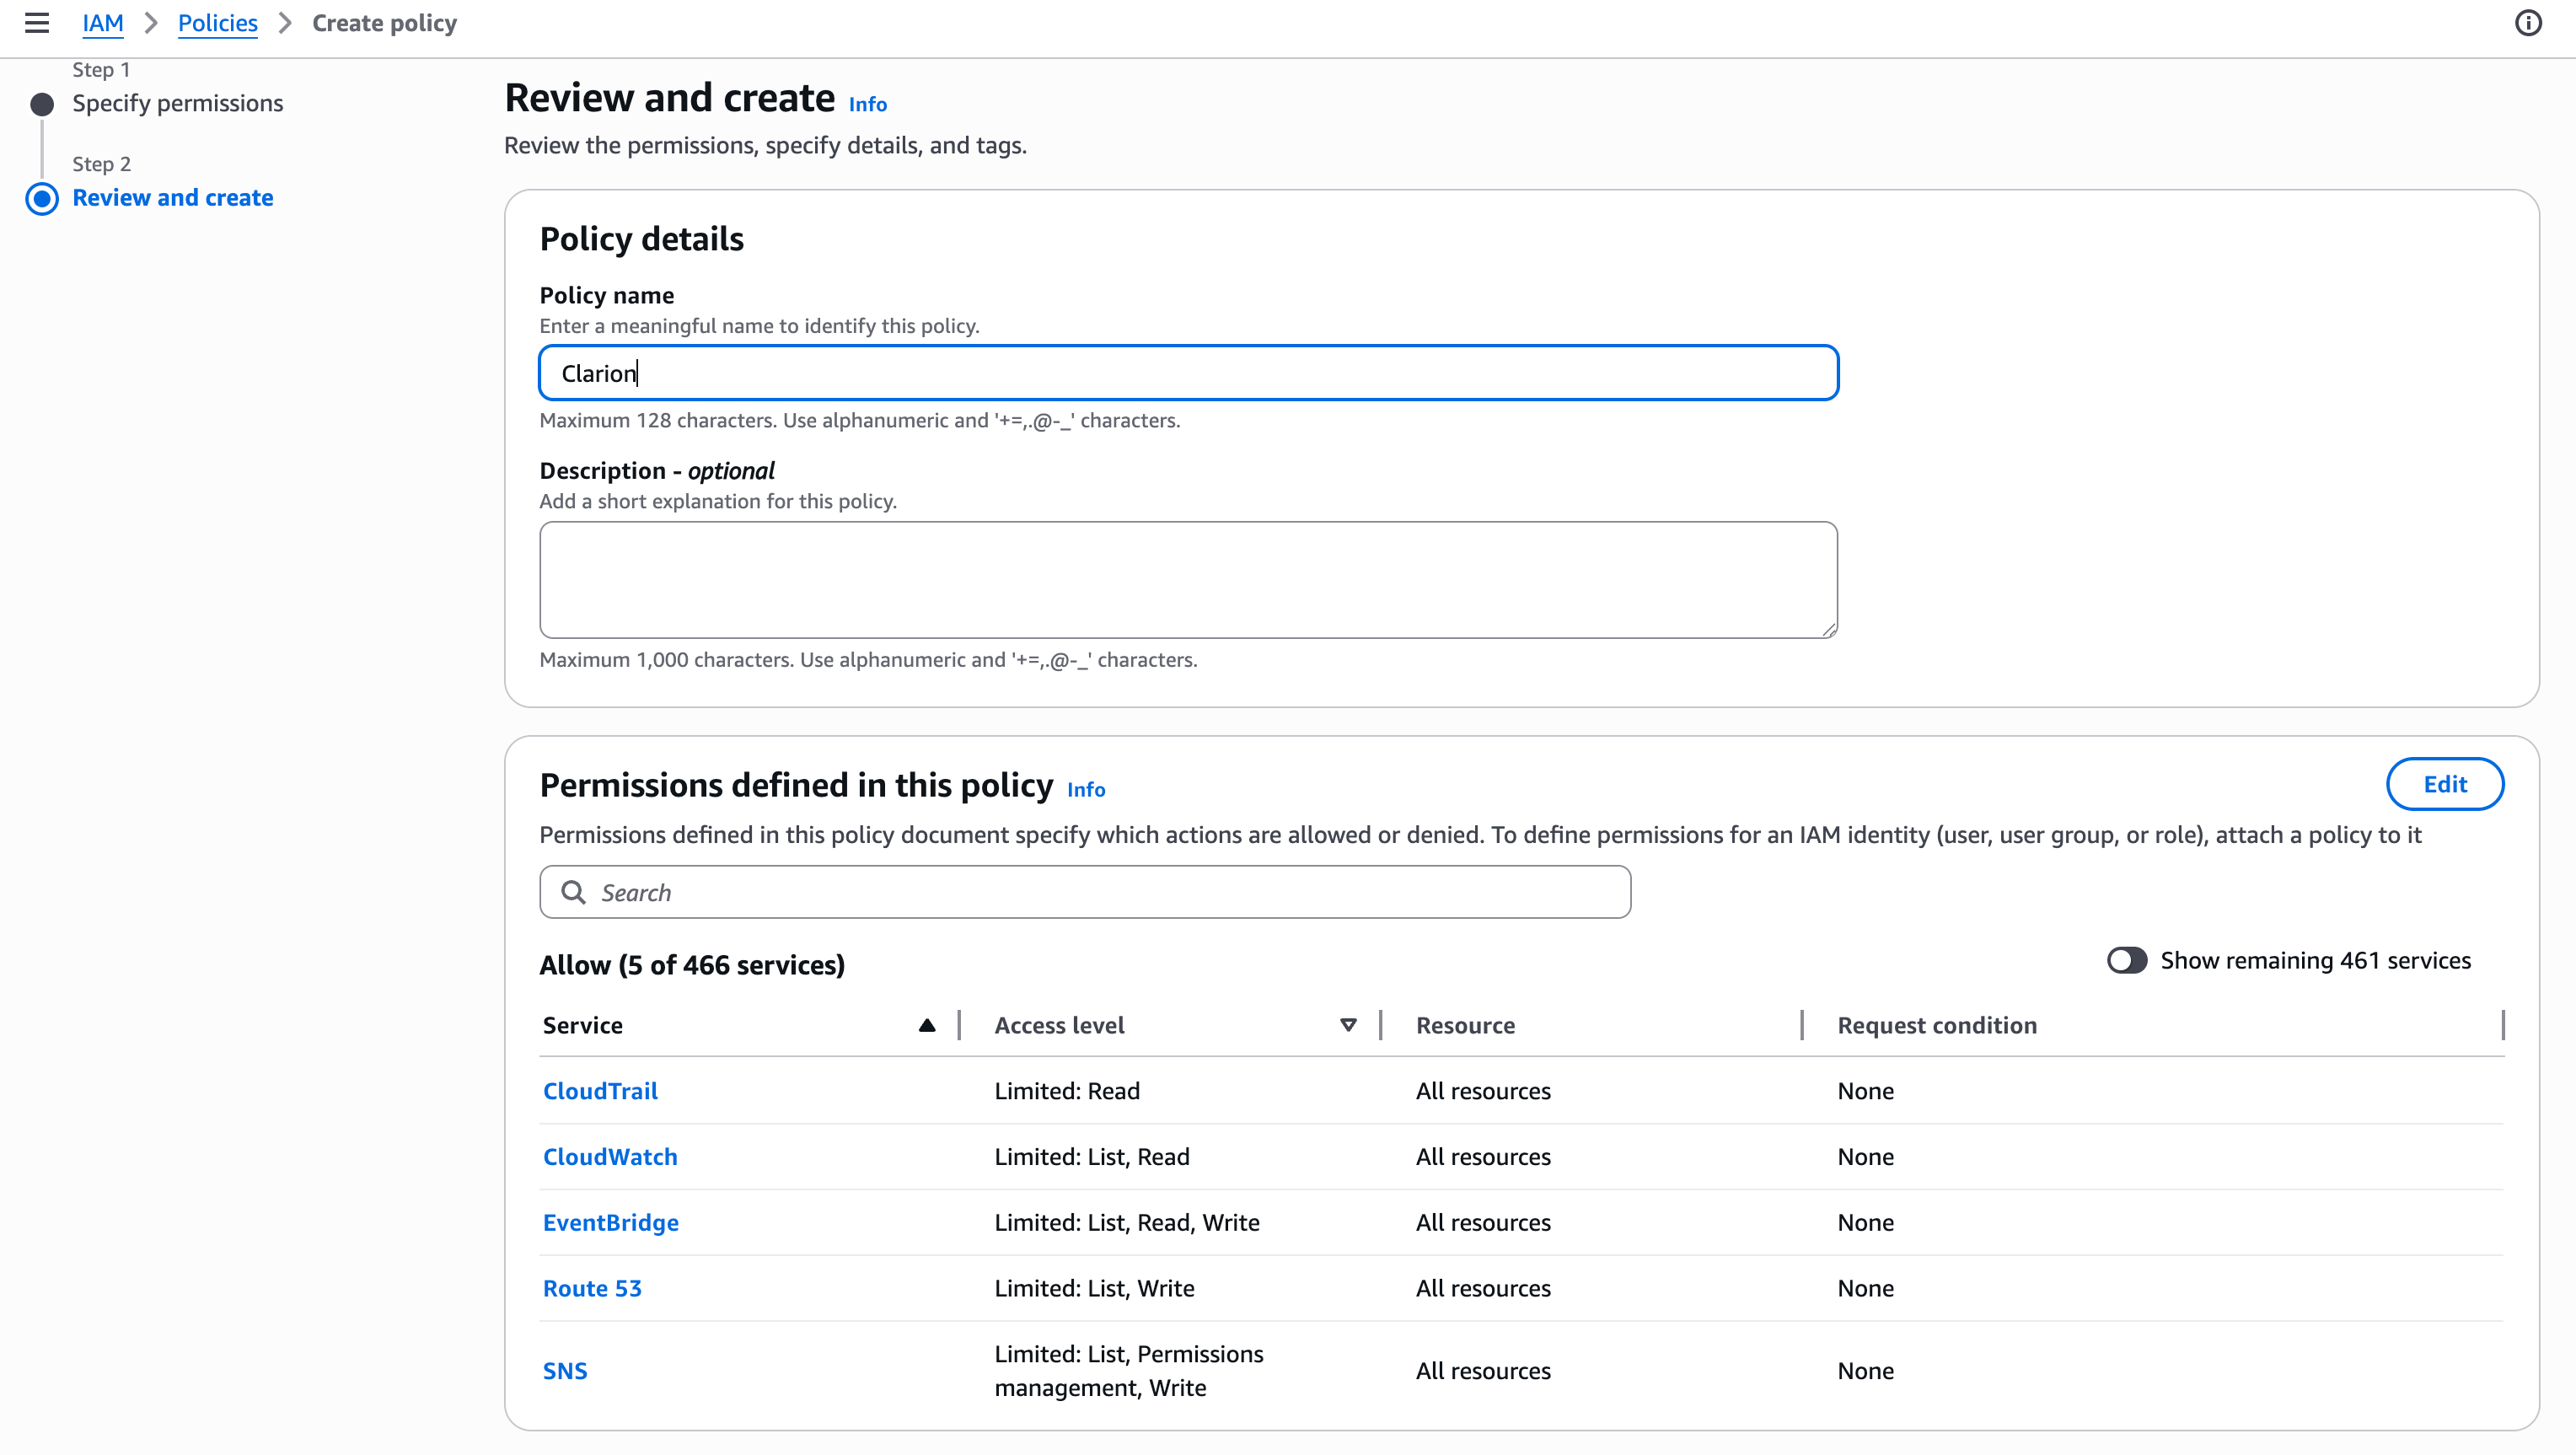
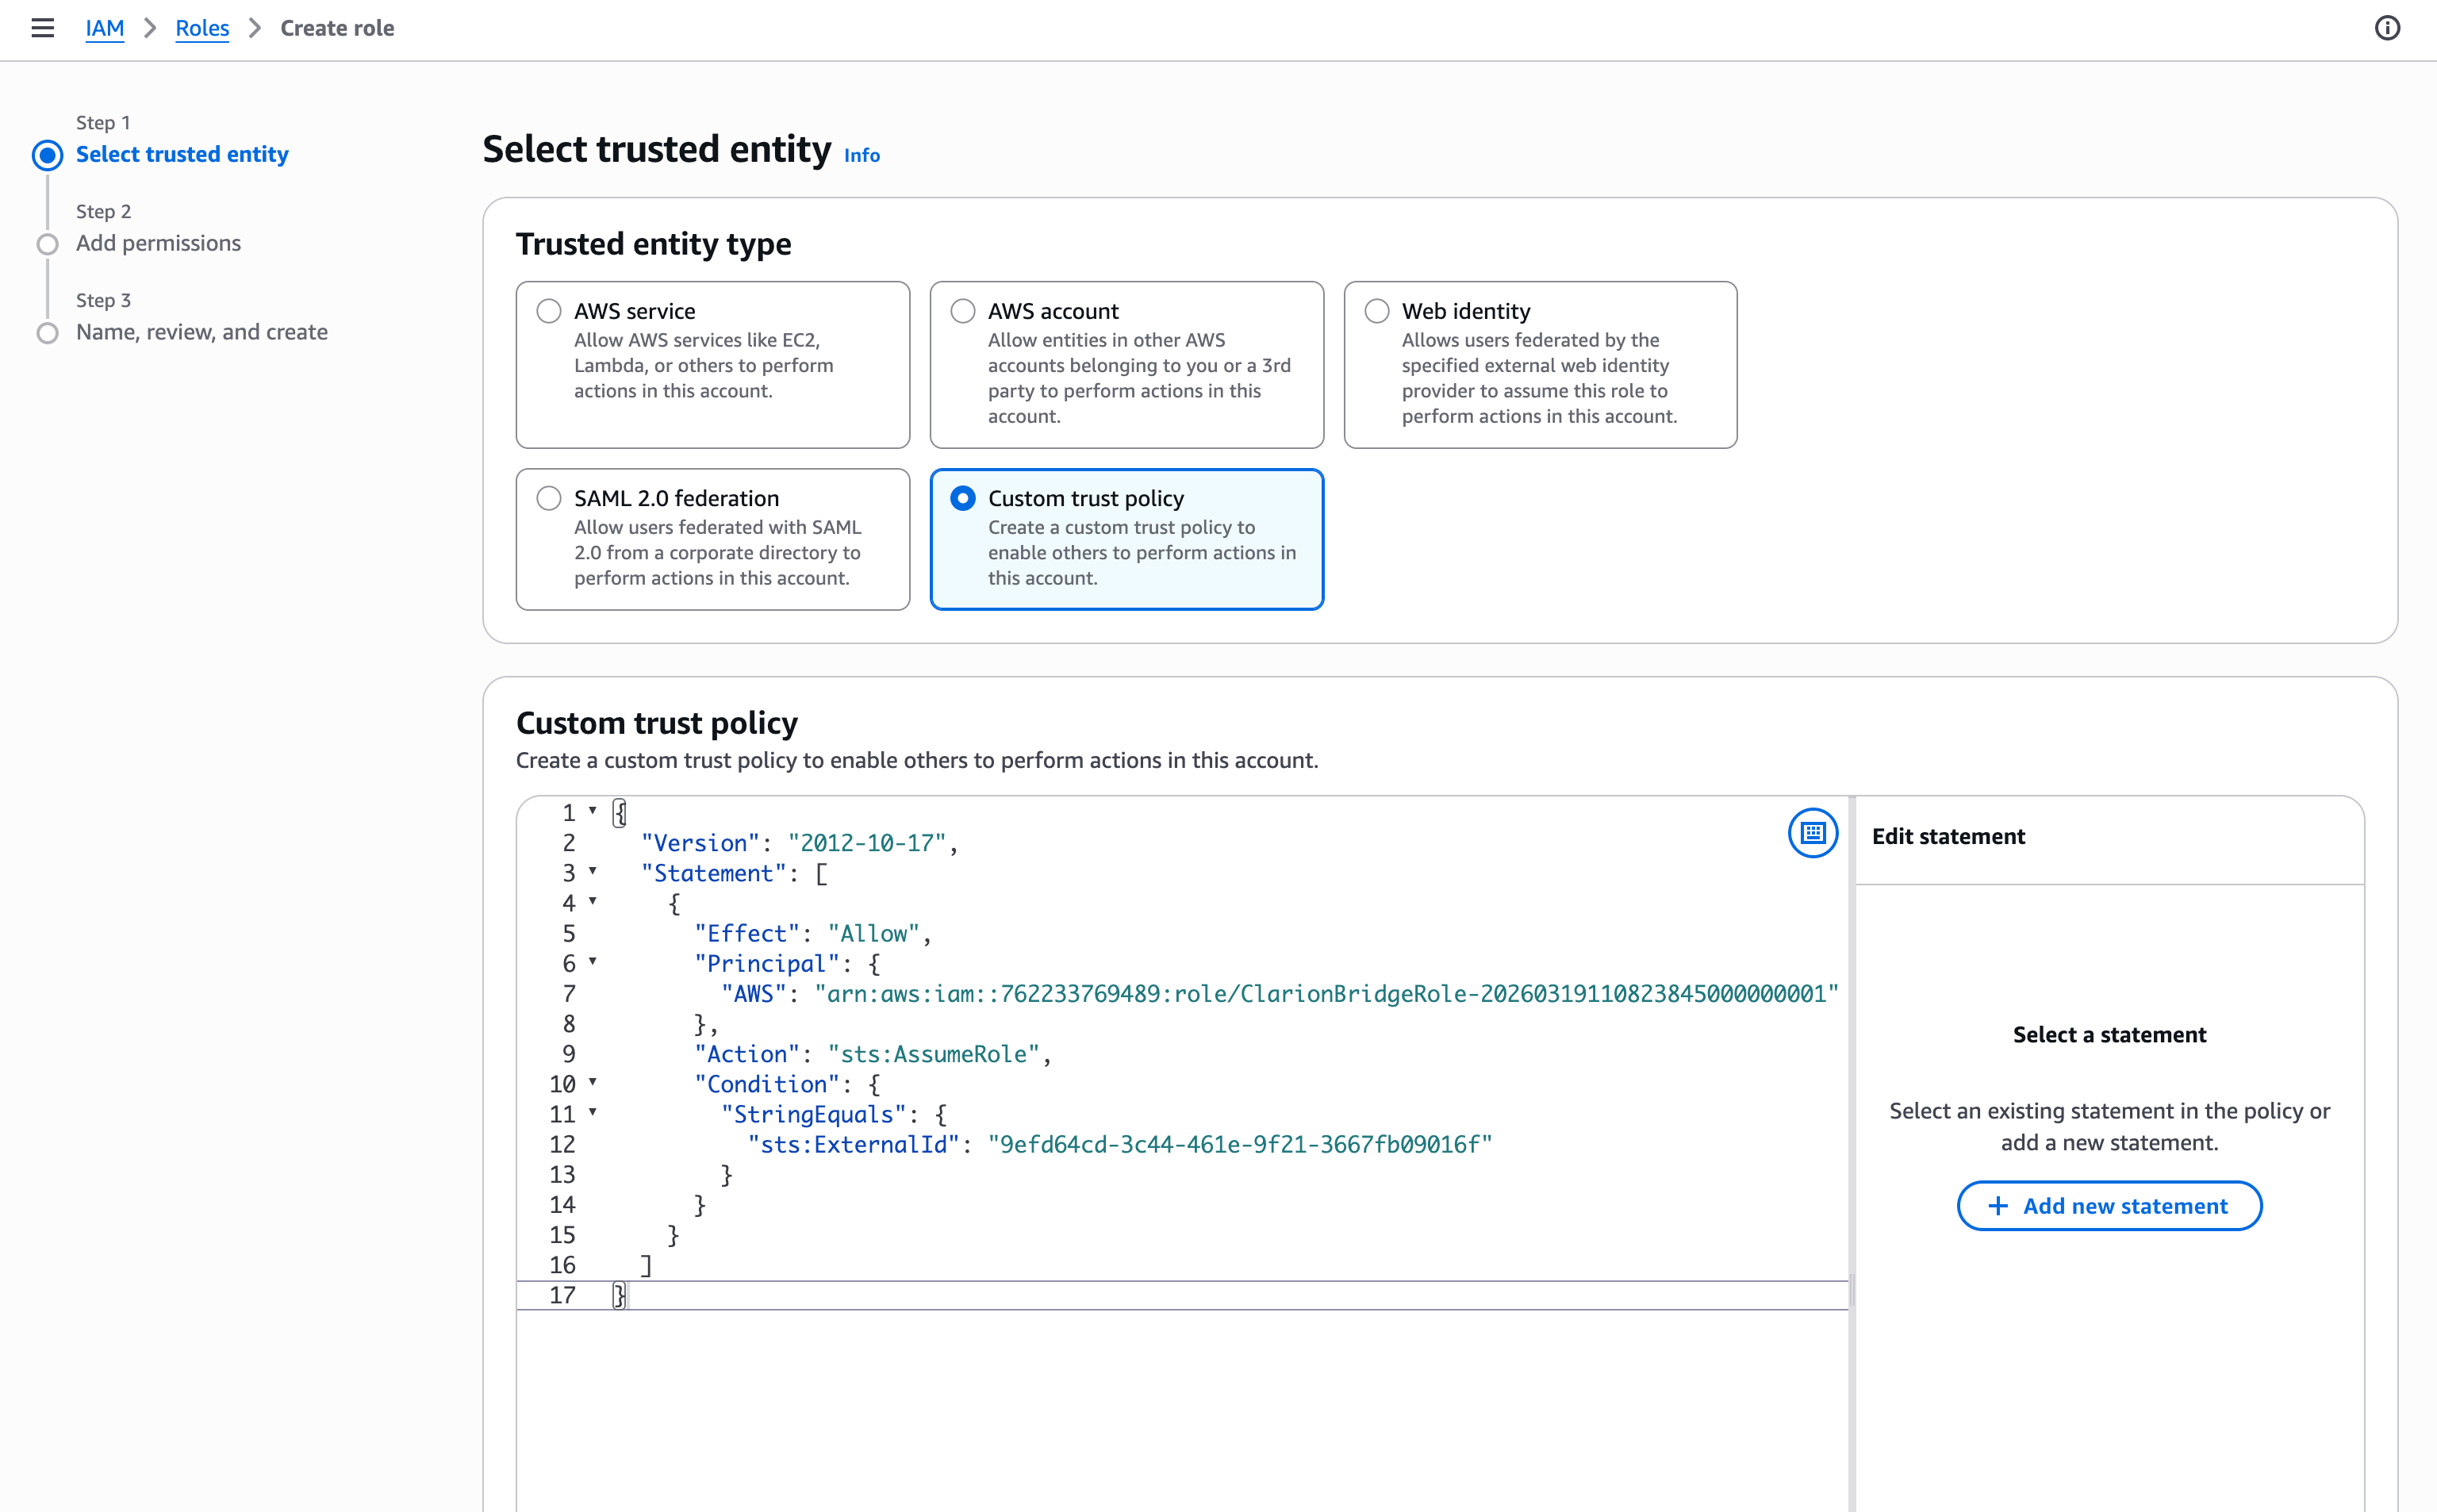
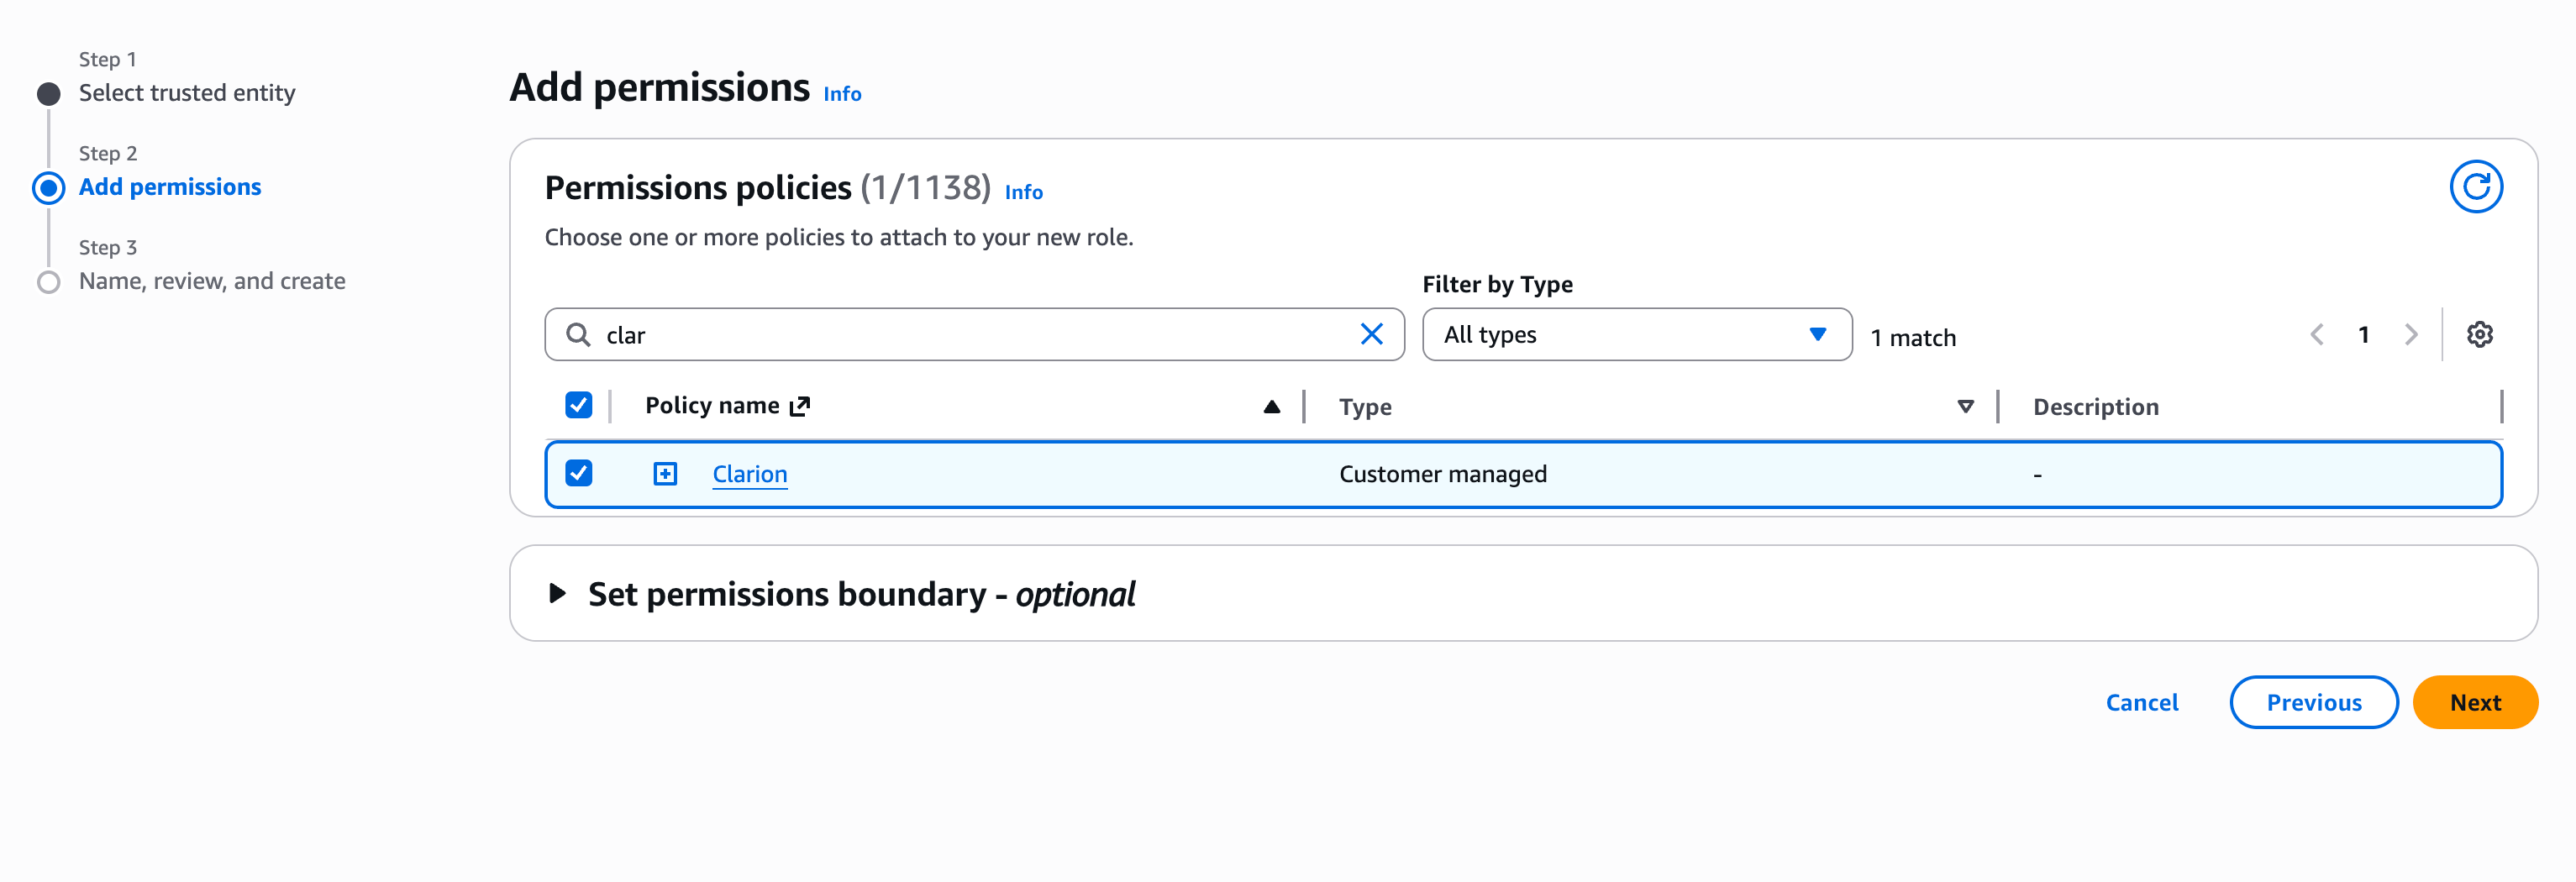
 Run these commands in your terminal. Replace the Principal ARN and External ID with the values shown in your Clarion integration wizard.
#### 1. Check if the role already exists
```bash theme={null}
aws iam get-role \
--role-name ClarionIntegrationRole \
--query 'Role.Arn' --output text 2>/dev/null
```
If this prints an ARN, the role already exists — skip to step 4 to update its trust policy. Otherwise, continue with step 2.
#### 2. Create the IAM policy
```bash theme={null}
aws iam create-policy \
--policy-name ClarionIntegrationPolicy \
--policy-document '{
"Version": "2012-10-17",
"Statement": [
{
"Sid": "ClarionRoute53",
"Effect": "Allow",
"Action": [
"route53:ListHostedZones",
"route53:GetHostedZone",
"route53:ListResourceRecordSets",
"route53:ChangeResourceRecordSets"
],
"Resource": "*"
},
{
"Sid": "ClarionCloudWatch",
"Effect": "Allow",
"Action": [
"cloudwatch:ListMetrics",
"cloudwatch:DescribeAlarms",
"cloudwatch:GetMetricData"
],
"Resource": "*"
},
{
"Sid": "ClarionCloudTrail",
"Effect": "Allow",
"Action": [
"cloudtrail:LookupEvents",
"cloudtrail:DescribeTrails",
"cloudtrail:GetTrailStatus"
],
"Resource": "*"
},
{
"Sid": "ClarionSNS",
"Effect": "Allow",
"Action": [
"sns:CreateTopic",
"sns:DeleteTopic",
"sns:Subscribe",
"sns:Unsubscribe",
"sns:SetTopicAttributes",
"sns:ListTopics",
"sns:GetTopicAttributes",
"sns:ListSubscriptionsByTopic"
],
"Resource": "*"
},
{
"Sid": "ClarionEventBridge",
"Effect": "Allow",
"Action": [
"events:PutRule",
"events:DeleteRule",
"events:PutTargets",
"events:RemoveTargets",
"events:ListRules",
"events:DescribeRule"
],
"Resource": "*"
}
]
}'
```
#### 3. Create the IAM role with trust policy
```bash theme={null}
aws iam create-role \
--role-name ClarionIntegrationRole \
--assume-role-policy-document '{
"Version": "2012-10-17",
"Statement": [
{
"Effect": "Allow",
"Principal": {
"AWS": ""
},
"Action": "sts:AssumeRole",
"Condition": {
"StringEquals": {
"sts:ExternalId": ""
}
}
}
]
}'
```
#### 4. Update the trust policy (existing role only)
Run this instead of step 3 if the role already existed:
```bash theme={null}
aws iam update-assume-role-policy \
--role-name ClarionIntegrationRole \
--policy-document '{
"Version": "2012-10-17",
"Statement": [
{
"Effect": "Allow",
"Principal": {
"AWS": ""
},
"Action": "sts:AssumeRole",
"Condition": {
"StringEquals": {
"sts:ExternalId": ""
}
}
}
]
}'
```
#### 5. Attach the policy to the role
```bash theme={null}
aws iam attach-role-policy \
--role-name ClarionIntegrationRole \
--policy-arn "arn:aws:iam::$(aws sts get-caller-identity --query Account --output text):policy/ClarionIntegrationPolicy"
```
After running these commands, copy the Role ARN from step 1 (existing role) or step 3 (new role) and paste it into Clarion.
***
## Step 4B — Connecting Multiple AWS Accounts
Agent MCP tools (`aws_describe`, `aws_logs_insights`, `aws_athena`, `aws_cloudtrail`, `inspect_alb_auth`) can target any account you connect to the workspace. Repeat Step 4 once per account: create a `ClarionIntegrationRole` in each account, give it the same trust policy and IAM policy, and add the role ARN to Clarion's AWS integration as a new connected account.
When invoking an AWS MCP, the agent passes an `accountId` parameter to select which account the call should hit. Omitting the parameter falls back to the primary account.
### 4B.1 Pick a primary
Exactly one connected account is marked **primary**. The primary's role is used whenever an MCP call omits `accountId`. Pick the account you query most often — typically the AWS Organizations log-archive account if you also use the consolidated-S3 ingest from [Step 1B](#step-1b-cloudtrail-via-consolidated-s3-logging).
### 4B.2 External ID
By default every connected account uses the same workspace external ID, so you paste the same value into every role's trust policy. If you want stricter isolation between accounts (a separate external ID per account so a leak in one does not compromise the others), generate a per-account external ID in the Clarion UI's account-list panel and use that in the corresponding role's trust policy.
### 4B.3 IAM policy
Every connected account's role uses the same IAM policy JSON from Step 4. Permission selection (the `iamPermissionGroupIds` list) is workspace-wide for now — every connected account is expected to honor the same set of granted permissions.
Agents discover connected accounts through the MCP tool schema: passing an unknown `accountId` returns a structured error listing the known accounts so the agent can self-correct and retry. The agent does not have to enumerate accounts ahead of time — it can start with the account ID from a CloudTrail event's `recipientAccountId` and Clarion will route accordingly.
***
## Step 5 — Activate Monitors in Clarion
1. Go back to Clarion and add the **CloudTrail** monitor.
2. Enable all the rules, then confirm.
3. Review the listed event types and click to enable all relevant ones.
4. If you set up GuardDuty or CloudWatch, add the **GuardDuty** and **CloudWatch** monitors as well. These monitors receive alerts directly, so you don't have to configure additional rules.
You're done! Clarion is now receiving CloudTrail events, CloudWatch alarms, and GuardDuty findings from your AWS account.
Run these commands in your terminal. Replace the Principal ARN and External ID with the values shown in your Clarion integration wizard.
#### 1. Check if the role already exists
```bash theme={null}
aws iam get-role \
--role-name ClarionIntegrationRole \
--query 'Role.Arn' --output text 2>/dev/null
```
If this prints an ARN, the role already exists — skip to step 4 to update its trust policy. Otherwise, continue with step 2.
#### 2. Create the IAM policy
```bash theme={null}
aws iam create-policy \
--policy-name ClarionIntegrationPolicy \
--policy-document '{
"Version": "2012-10-17",
"Statement": [
{
"Sid": "ClarionRoute53",
"Effect": "Allow",
"Action": [
"route53:ListHostedZones",
"route53:GetHostedZone",
"route53:ListResourceRecordSets",
"route53:ChangeResourceRecordSets"
],
"Resource": "*"
},
{
"Sid": "ClarionCloudWatch",
"Effect": "Allow",
"Action": [
"cloudwatch:ListMetrics",
"cloudwatch:DescribeAlarms",
"cloudwatch:GetMetricData"
],
"Resource": "*"
},
{
"Sid": "ClarionCloudTrail",
"Effect": "Allow",
"Action": [
"cloudtrail:LookupEvents",
"cloudtrail:DescribeTrails",
"cloudtrail:GetTrailStatus"
],
"Resource": "*"
},
{
"Sid": "ClarionSNS",
"Effect": "Allow",
"Action": [
"sns:CreateTopic",
"sns:DeleteTopic",
"sns:Subscribe",
"sns:Unsubscribe",
"sns:SetTopicAttributes",
"sns:ListTopics",
"sns:GetTopicAttributes",
"sns:ListSubscriptionsByTopic"
],
"Resource": "*"
},
{
"Sid": "ClarionEventBridge",
"Effect": "Allow",
"Action": [
"events:PutRule",
"events:DeleteRule",
"events:PutTargets",
"events:RemoveTargets",
"events:ListRules",
"events:DescribeRule"
],
"Resource": "*"
}
]
}'
```
#### 3. Create the IAM role with trust policy
```bash theme={null}
aws iam create-role \
--role-name ClarionIntegrationRole \
--assume-role-policy-document '{
"Version": "2012-10-17",
"Statement": [
{
"Effect": "Allow",
"Principal": {
"AWS": ""
},
"Action": "sts:AssumeRole",
"Condition": {
"StringEquals": {
"sts:ExternalId": ""
}
}
}
]
}'
```
#### 4. Update the trust policy (existing role only)
Run this instead of step 3 if the role already existed:
```bash theme={null}
aws iam update-assume-role-policy \
--role-name ClarionIntegrationRole \
--policy-document '{
"Version": "2012-10-17",
"Statement": [
{
"Effect": "Allow",
"Principal": {
"AWS": ""
},
"Action": "sts:AssumeRole",
"Condition": {
"StringEquals": {
"sts:ExternalId": ""
}
}
}
]
}'
```
#### 5. Attach the policy to the role
```bash theme={null}
aws iam attach-role-policy \
--role-name ClarionIntegrationRole \
--policy-arn "arn:aws:iam::$(aws sts get-caller-identity --query Account --output text):policy/ClarionIntegrationPolicy"
```
After running these commands, copy the Role ARN from step 1 (existing role) or step 3 (new role) and paste it into Clarion.
***
## Step 4B — Connecting Multiple AWS Accounts
Agent MCP tools (`aws_describe`, `aws_logs_insights`, `aws_athena`, `aws_cloudtrail`, `inspect_alb_auth`) can target any account you connect to the workspace. Repeat Step 4 once per account: create a `ClarionIntegrationRole` in each account, give it the same trust policy and IAM policy, and add the role ARN to Clarion's AWS integration as a new connected account.
When invoking an AWS MCP, the agent passes an `accountId` parameter to select which account the call should hit. Omitting the parameter falls back to the primary account.
### 4B.1 Pick a primary
Exactly one connected account is marked **primary**. The primary's role is used whenever an MCP call omits `accountId`. Pick the account you query most often — typically the AWS Organizations log-archive account if you also use the consolidated-S3 ingest from [Step 1B](#step-1b-cloudtrail-via-consolidated-s3-logging).
### 4B.2 External ID
By default every connected account uses the same workspace external ID, so you paste the same value into every role's trust policy. If you want stricter isolation between accounts (a separate external ID per account so a leak in one does not compromise the others), generate a per-account external ID in the Clarion UI's account-list panel and use that in the corresponding role's trust policy.
### 4B.3 IAM policy
Every connected account's role uses the same IAM policy JSON from Step 4. Permission selection (the `iamPermissionGroupIds` list) is workspace-wide for now — every connected account is expected to honor the same set of granted permissions.
Agents discover connected accounts through the MCP tool schema: passing an unknown `accountId` returns a structured error listing the known accounts so the agent can self-correct and retry. The agent does not have to enumerate accounts ahead of time — it can start with the account ID from a CloudTrail event's `recipientAccountId` and Clarion will route accordingly.
***
## Step 5 — Activate Monitors in Clarion
1. Go back to Clarion and add the **CloudTrail** monitor.
2. Enable all the rules, then confirm.
3. Review the listed event types and click to enable all relevant ones.
4. If you set up GuardDuty or CloudWatch, add the **GuardDuty** and **CloudWatch** monitors as well. These monitors receive alerts directly, so you don't have to configure additional rules.
You're done! Clarion is now receiving CloudTrail events, CloudWatch alarms, and GuardDuty findings from your AWS account.